The S2000


I haven't done much to my car. I think the big task for this winter will be to search down all the vibrations in the convertible top and get them quieted down.
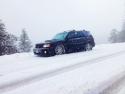
I have really enjoyed driving the car though I prefer top down. This is definitely the time of year for it.
I don't foresee a lot of changes in the future. I would like to finish the exhaust system with a PLM header and a high flow catalytic converter. At that time, I'd also like to start running an AEM EMS for it. This would allow a little better tuning and lowering of vtec for smoother engagement and a little more power under the curve.
[ATTACH]2787[/ATTACH]
- Attachments
-
I plan to change some fluids this weekend. The plan is to replace the tranny and diff fluids. I also want to drain and recharge my coolant.
Coolant System DIY
http://www.s2ki.com/s2000/topic/998925-how-to-change-your-coolant-for-dummies/
Coolant System DIY
http://www.s2ki.com/s2000/topic/998925-how-to-change-your-coolant-for-dummies/
-
RX-7 Chris
- Posts: 7800
- Joined: Tue Oct 02, 2007 9:14
- Location: Colorado Springs
- Contact:
Were you able to get the fluids changed on your car? Sorry we ran out of time on Saturday.
1984 RX-7 GSL-SE [size=84]My restomod project[/SIZE]
1964 Ford Galaxie 500XL flat black w/ white interior, 2 dr fastback, 390 thunderbird, C6 auto, 2500 rpm high stall converter, shift kit, AC, Holley 750 cfm
[size=100]RIP 1983 RX-7[/SIZE]
My Car Blog
Depending on my experience at the track, I might add some brake ducting in the future. I think this is a pretty good little idea. I have a diffeerent, more aesthetically pleasing way of attaching the ducts (I think)
http://robrobinette.com/S2000BrakeDucts.htm
http://robrobinette.com/S2000BrakeDucts.htm
-
RX-7 Chris
- Posts: 7800
- Joined: Tue Oct 02, 2007 9:14
- Location: Colorado Springs
- Contact:
I'm really surprised there isn't anything from the factory. My car even has a basic brake cooling setup from the factory. There is a duct in the lower valance with a square cup in the brake disc shield.
1984 RX-7 GSL-SE [size=84]My restomod project[/SIZE]
1964 Ford Galaxie 500XL flat black w/ white interior, 2 dr fastback, 390 thunderbird, C6 auto, 2500 rpm high stall converter, shift kit, AC, Holley 750 cfm
[size=100]RIP 1983 RX-7[/SIZE]
My Car Blog
-
speedjunkie

- Senior Member
- Posts: 5359
- Joined: Wed Jan 02, 2008 9:14
- Location: Colorado Springs
- Contact:

My model year s2000 (AP1) had standard green coolant in it from the factory. With 51k miles after 14 years, I thought it would be a good idea to change that fluid out. Although I'm not certain it was factory coolant, given the 100k flush interval and me buying the car used, that is my assumption.
Honda now recommends their type 2 coolant. This coolant is blue in color. Based on some suggestions, I opted to flush the cooling system with distilled water, then refill with the Honda type 2. Distilled water was used to prevent mineral build up in the system that can be caused by tap water. For people on well water, this is particularly applicable.
To flush the system:
1. Park the car slightly inclined and turn the heater to max hot
2. Take the radiator cap off
3. Place catch basin under car
4. Open the radiator drain petcock
(located on the back of the radiator, at the bottom, and in the center)
5. Loosen the front bleed screw
(12mm; front drivers side of valve cover and looks similar to a zerk fitting)
6. While that was draining, I opened the coolant reservoir and stuck the hose into the radiator opening to hold it.
7. Rinse the reservoir with distilled water, then fill to max line and replace and put cap back on
8. Open the back bleed fitting
(Pliers: top center of firewall with rubber cap held on by small clamp.)
9. Once the coolant has stopped draining close the drain petcock
10. Begin filling the radiator with disrilled water and fill until water is coming out of the back bleed fitting and then the front bleed screw
11. Close the rear and front bleeders and the radiator
12. Idle car to operating temperature
At this point, I opted to let the car run for about 5 minutes. And bled the system of air for practice since this was my first time. I will cover bleeding below. However, to drain the water in preparation of new coolant, I followed the procedure above. Once the water was flushed, I added the coolant in place of distilled water as above.
Bleeding the system is required to prevent engine damage from air trapped in the system.
1. Park car with nose slightly inclined as before.
2. Turn heater to max hot and fans to max speed
3. Start engine and allow to idle to operating temperature
4. With a rag or gloves protecting one hand, open the front bleed screw slightly (12mm) and listen for hissing air.
5. When the hissing has stopped squeeze the upper radiator hose flat with the protected hand and when the additional hissing stops tighten the front bleed screw while the hose is still compressed
6. Allow the car to idle for 2-3 minutes and repeat steps 4 and 5 until coolant comes out of the front bleed screw with no air.

Trapped air is scary in modern complex cooling systems.
The method I use just to be absolutely certain I don't get an air bubble trapped is:
get a long funnel or a funnel with a hose so that the funnel can fill the radiator and be approximately 1' higher then the highest point in the system and fit it snugly into the filler so that no coolant comes out.
If the system has bleeders, open them and attach flexible rubber or vinyl tubing from them to the top of the funnel.
Fill the system with water/coolant, and start the car. maintain the funnel 1/2 to 2/3 full.
Turn on the heat, and start the car.
Monitor the level of the funnel and maintain it.
Once bubbles stop flowing through the bleeders close them. continue to run untill the fans cycle, the open the bleeders again. If no bubbles come out it is good. close them and shut off the car.
Hope this helps for future flushes.
-
RX-7 Chris
- Posts: 7800
- Joined: Tue Oct 02, 2007 9:14
- Location: Colorado Springs
- Contact:
Let me know if you need my help with this over the weekend. I'm available and I have the lisle funnel.
1984 RX-7 GSL-SE [size=84]My restomod project[/SIZE]
1964 Ford Galaxie 500XL flat black w/ white interior, 2 dr fastback, 390 thunderbird, C6 auto, 2500 rpm high stall converter, shift kit, AC, Holley 750 cfm
[size=100]RIP 1983 RX-7[/SIZE]
My Car Blog

Re: The S2000
Well, the P0113 code popped again. So far I have tested the system once arriving at the conclusion that the ECU was good and the AIT sensor was good, leaving a bad wiring connection by the previous owner as the likely culprit. Replaced the sensor any way when the splice was redone with a butt end style splice with the solder in the middle. That was working fine, but then the code popped again. This time, I just had a friend that builds custom motorcycles and wiring harnesses resolder the wires together. After that, it was working fine for the most part, but then it popped. I replaced the sensor. It worked for about a year, and it popped again about two weeks ago. I noticed a little oil in the PCV valve hose that dumps immediately upstream of the AIT sensor in the air intake tube. I replaced that along with the sensor. Thought I was golden, but the code popped again.
It is rather annoying. that code indicates a high reading, so the car thinks it is well below freezing resulting in a rich fuel blend. DWDUC is going to help me redo the wire again this Sunday.
If it is possible, would love to get Junkie to roll the fenders too. At least get that aspect of the car right (a little rub on the rear driver fender).
-
RX-7 Chris
- Posts: 7800
- Joined: Tue Oct 02, 2007 9:14
- Location: Colorado Springs
- Contact:
Re: The S2000
I'm sure you will get this figured out.
1984 RX-7 GSL-SE [size=84]My restomod project[/SIZE]
1964 Ford Galaxie 500XL flat black w/ white interior, 2 dr fastback, 390 thunderbird, C6 auto, 2500 rpm high stall converter, shift kit, AC, Holley 750 cfm
[size=100]RIP 1983 RX-7[/SIZE]
My Car Blog
Who is online
Users browsing this forum: No registered users and 97 guests