Build thread

Talk about your Rotaries!
User avatar
speedjunkie
Senior Member
Posts: 5292
Joined: Wed Jan 02, 2008 9:14
Location: Colorado Springs
Contact:

Re: Build thread

Postby speedjunkie » Sun Feb 28, 2016 9:14

I went to Arvada to see Brad today and use his tube bender to make a hard line for the turbo oil drain. I'll just skip ahead and say I'm just going to use a rubber line most likely lol. The tube bender doesn't make a tight enough bend for the limited room I have.

That's pretty much all I got done today. I'm going to try to get a lot done tomorrow. I feel like I'm way behind.

EDIT: I meant to add pics last night, I guess I forgot. I was able to do one version of a hard line/soft line combo, but it's still kind of a pain.
Image
Last edited by speedjunkie on Mon Feb 29, 2016 9:14, edited 1 time in total.

User avatar
Shadowden
Posts: 2288
Joined: Fri Aug 05, 2011 9:14
Location: Highlands Ranch
Contact:

Re: Build thread

Postby Shadowden » Sun Feb 28, 2016 9:14

I think that color will look great on the calipers.

User avatar
speedjunkie
Senior Member
Posts: 5292
Joined: Wed Jan 02, 2008 9:14
Location: Colorado Springs
Contact:

Re: Build thread

Postby speedjunkie » Mon Feb 29, 2016 9:14

Yeah I think so too. But just in case I ordered five swatches, that one included, and we'll see who the winner is lol.

I worked on the subframe again today. I used a wire wheel to clean off some rust, then sprayed the whole thing with black Duplicolor acrylic paint. It came out looking pretty much new. I transferred the hard brake lines, plastic clips, and extra bracing (the 94s and up came with extra bracing that can be removed). I also drilled an extra hole for mounting the fuel filter panel, just for some extra piece of mind. It's ready to go back into the car, I'll try to do that tomorrow night.
Image
Image
Image

Andy came over tonight and had a good idea about the oil drain line and I might still be able to do a hard line. I ordered an extra flange and 45 degree fitting for the engine side of the drain so I can have the fittings pointed kinda towards each other and should be able to get away with a simple 45 degree bend in the hard line and do a tube sleeve and nut on both ends too. We'll see how that goes lol.

User avatar
RX-7 Chris
Posts: 7800
Joined: Tue Oct 02, 2007 9:14
Location: Colorado Springs
Contact:

Re: Build thread

Postby RX-7 Chris » Mon Feb 29, 2016 9:14

That looks really clean.
1984 RX-7 GSL-SE [size=84]My restomod project[/SIZE]


1964 Ford Galaxie 500XL flat black w/ white interior, 2 dr fastback, 390 thunderbird, C6 auto, 2500 rpm high stall converter, shift kit, AC, Holley 750 cfm

[size=100]RIP 1983 RX-7[/SIZE]

My Car Blog

User avatar
speedjunkie
Senior Member
Posts: 5292
Joined: Wed Jan 02, 2008 9:14
Location: Colorado Springs
Contact:

Re: Build thread

Postby speedjunkie » Mon Feb 29, 2016 9:14

Thanks! The paint came out really well. I did notice tonight that I missed a couple spots though and it drives me crazy lol. I installed it tonight, that's pretty much all I did lol.
Image

I talked to Chris and he got my ECU back from Syvecs today. He's testing it out to make sure everything works before sending it back. I also got a few boxes of goodies today, and another one is at the post office ready for pickup. I'm also talking to him about tuning one or two other cars. Brad wants to get tuned, but there may be space for one more. Chris said he's hesitant about tuning a car he hasn't worked on, and I understand completely.

I got the suspension arms. Some of them are kinda beat up, so I'll have to decide if I want to use them or just use my original ones, as much as I don't want to push out the older SuperPro bushings. The box was ripped wide open so I was concerned maybe I lost something, but it looks like all the parts are there. Even the toe links that he threw in for free apparently.
Image
Image

I got the bushings from J Auto, along with the other things I ordered from there.
Image
Image

I got the rear speaker brackets and hatch/fuel door lever cover. The cover is gouged in a couple places but overall in good shape, and you can tell the brackets were cut and they are bent a little, but I think they'll work. And as cheap as I got this stuff I really can't complain. Now I just need to find some speaker covers and run the wiring.
Image

I decided to get the coin/card holder from the guy in Japan after seeing the one in Brad's car on Saturday. Turns out he's the one that bought the one from Facebook that I originally saw, which was when I discovered that this thing even exists. It's a pretty cool little piece. Probably not worth what I'm paying lol, but I'm sure I can find someone else to buy it for a comparable price if I ever decide to sell it. I'm also looking at getting a few other pieces from a guy on 7club, mainly just interior pieces that are in better condition than my stuff. I'm going to look for newer plastics for the hatch and the quarter panels, and I'd like to find some bins in better condition but mine are already cut and I don't think I could bring myself to cut newer condition bins. One reason I want to replace the quarter panels is because the tabs on the back of them are breaking one by one every time I remove them, eventually there won't be any to hold them in. They're also kinda gouged up, at least the one on the passenger side is.

User avatar
speedjunkie
Senior Member
Posts: 5292
Joined: Wed Jan 02, 2008 9:14
Location: Colorado Springs
Contact:

Re: Build thread

Postby speedjunkie » Fri Mar 04, 2016 9:14

I got some more parts yesterday and ordered even more today haha, mainly a MAC 4 port boost valve (I'm not sure yet I'll end up using this, but supposedly they are more accurate at controlling boost than the EFR valve, especially when using a dual port wastegate actuator).

I went to the AF Academy last night and stayed the night for my sleep study to see if I have sleep apnea. Correction, it was so I could show them I have sleep apnea because I KNOW I do. I wake up gasping for air on some nights, or maybe all nights and I just don't remember them all, I'm not sure. I'll find out the results in about 10 days they said, after the doctor looks at them. Moral of this story, I didn't do anything with the car last night.

I worked on it a little tonight after dinner. All I did was try to make a hard line and get the fittings modified and ready for us to weld them on tomorrow. However, I'm seeing more and more that this is just a PITA that's not worth the trouble, and I'm thinking if everything is set up right I shouldn't be pulling the turbo out much anyway. So I might just skip the hard line and stick with the push lok hose after all.

Saturday I'm going to the hobby shop on the Academy to sand blast my suspension arms and get them ready for coating, and probably push out the bushings while I'm there.

I still need to pull the dash and do the power and ground cables for the battery and swap the passthrough bolt for a brass one (including adding one on the passenger side of the tunnel for the ground cable), and troubleshoot the horn and blower motor issues. I think I'm going to go ahead and do the RX-8 starter mod as well.

User avatar
speedjunkie
Senior Member
Posts: 5292
Joined: Wed Jan 02, 2008 9:14
Location: Colorado Springs
Contact:

Re: Build thread

Postby speedjunkie » Mon Mar 07, 2016 9:14

Chris emailed me today and said he's shipping the ECU back tomorrow. He didn't confirm that he's sending the OMP back with it like I asked, but I assume he will.

Yesterday I got together the suspension arms and everything else I wanted to sandblast and started off for the Academy hobby shop, but they don't have a blasting cabinet lol. I might take them to Carson, but I really don't want to deal with the asshole that works there lol. Actually I'm not sure if he still works there and I don't remember exactly where the hobby shop is, but I imagine I can find it. I might not have any other choice. Other than that I didn't get much done. Actually I'm not sure I got ANYTHING else done, I really don't remember lol.

Today I got a good bit done because Zico was working in the garage too and it motivated me to work. I pulled the dash again and found what I hope is the issue for the HVAC blower. Brad told me there is a little black box that's supposed to be plugged in and I forget what it's for but it's not something one would think would be related to the blower. Well that was unplugged, so I hope that was the problem. I'm going to test it before fully putting the dash back in.
Image

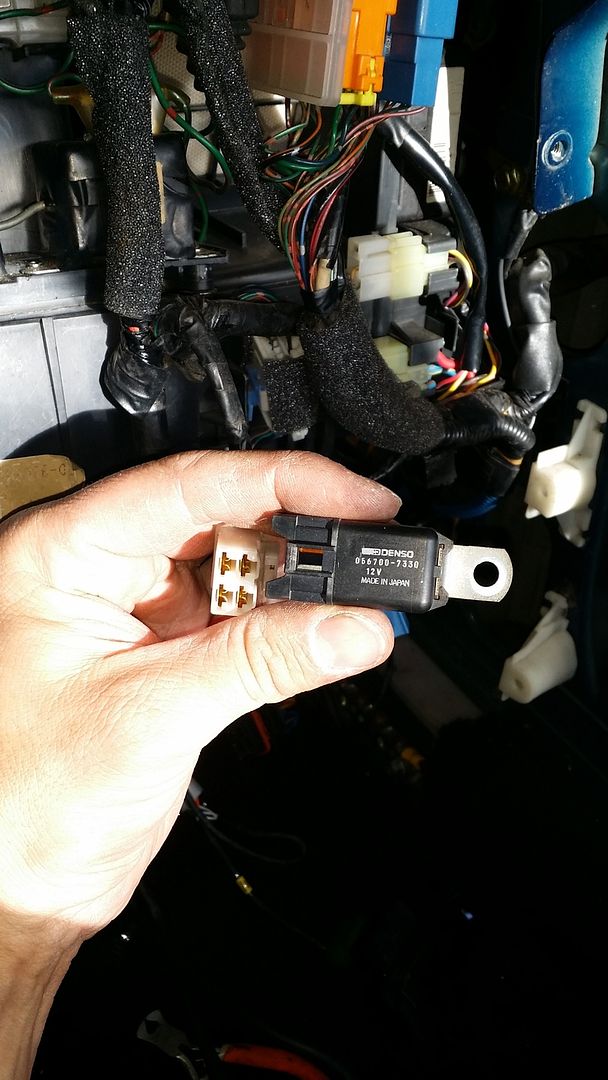
Now I need to investigate the horn issue. I'm thinking about just running wires straight from the steering wheel to the front and mounting the AOOGA horn. I'd really prefer sticking with stock though. I really hope it's not related to something I did with the harness when I had it pulled out last year.

Unfortunately I broke some interior pieces when I pulled the dash. Well, the cruise control button bottom mount broke so I'm hopeful I can just superglue that. I'd really love a new piece because this one is not in great shape, but it's a crapshoot buying a good one from someone and they're pretty hard to find and pretty pricy. I also broke the driver's door panel plastic when I was messing with the map pocket lid. And I need to find some rear speaker covers because I test mounted the brackets today and I'm not sure they're mounted right.

I pulled the power cable pass through today and I swapped the steel threaded rod for a brass rod. Tomorrow night I'll put it back in and make the cables. Zico reminded me that I don't have to make another one exactly like this for the ground cable since it's the ground but I might do it anyway, just to be sure it's a clean path to the battery.
Image

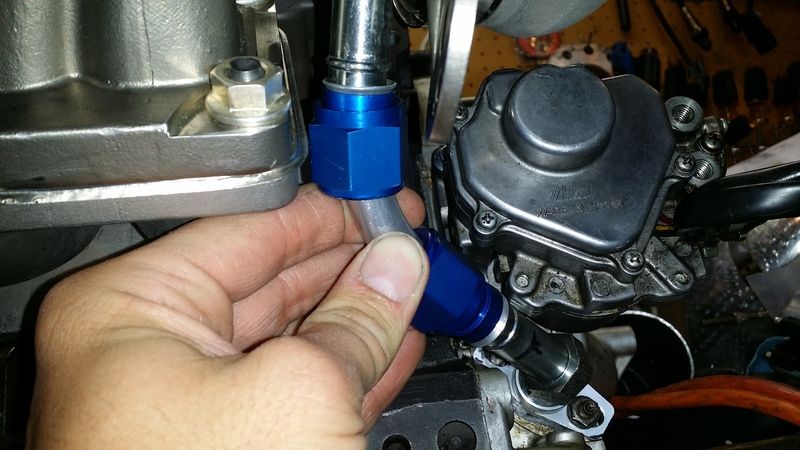
The Vband flange for the compressor outlet came in and it's the perfect size. I'm going to go to Whisler Bearing tomorrow and find a clamp for it. I'm also going to have them make a new oil feed line for the turbo because the one I ordered from ATP Turbo is a basic rubber lined braided line and I don't like it. They also sent me the 3.5" stainless elbow that they claimed "had good length on each end"...HA, there's about 6" on either end, not even close enough to work with. So I ordered a 2' straight piece from them. I'd like to start ordering from somewhere else. The oil line wasn't even close to what they show on their website. I could have made this one at home for much cheaper.

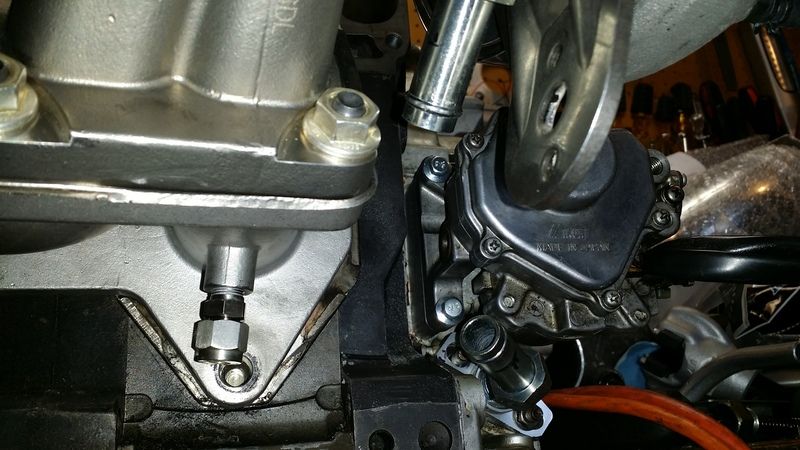
This is the hard line I made the other night to see if it was still possible. I basically decided to stick with a rubber line lol. I'm just not sure I could fit the fittings in there too and have it work out.
Image
Image
Image

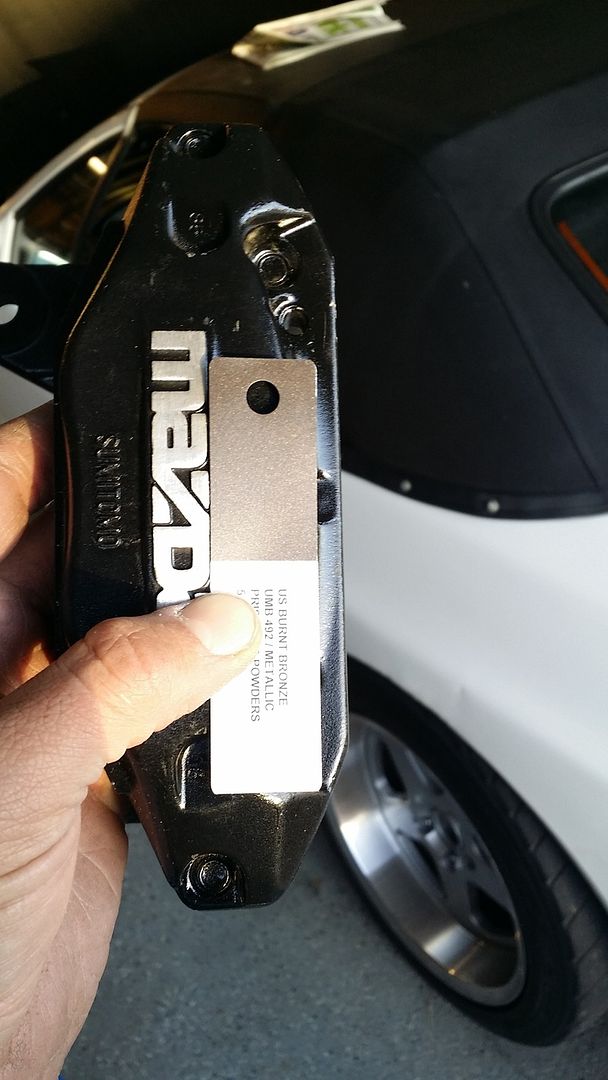
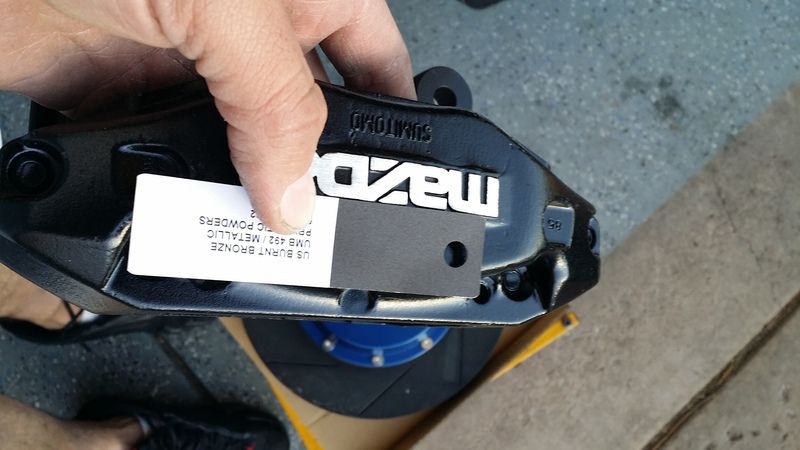
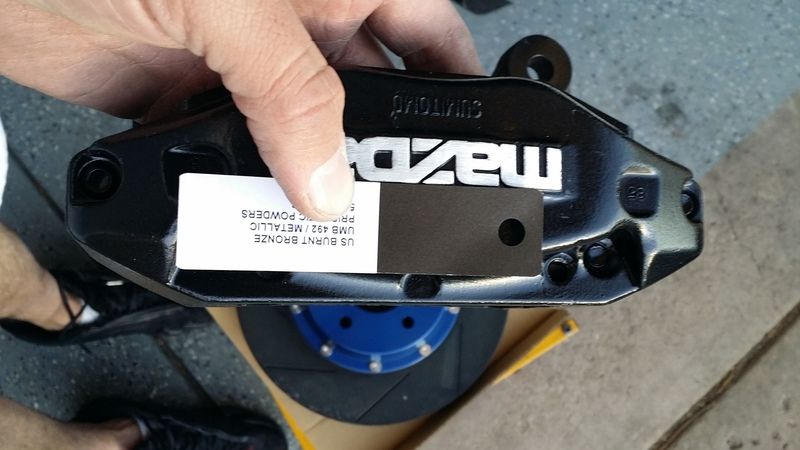
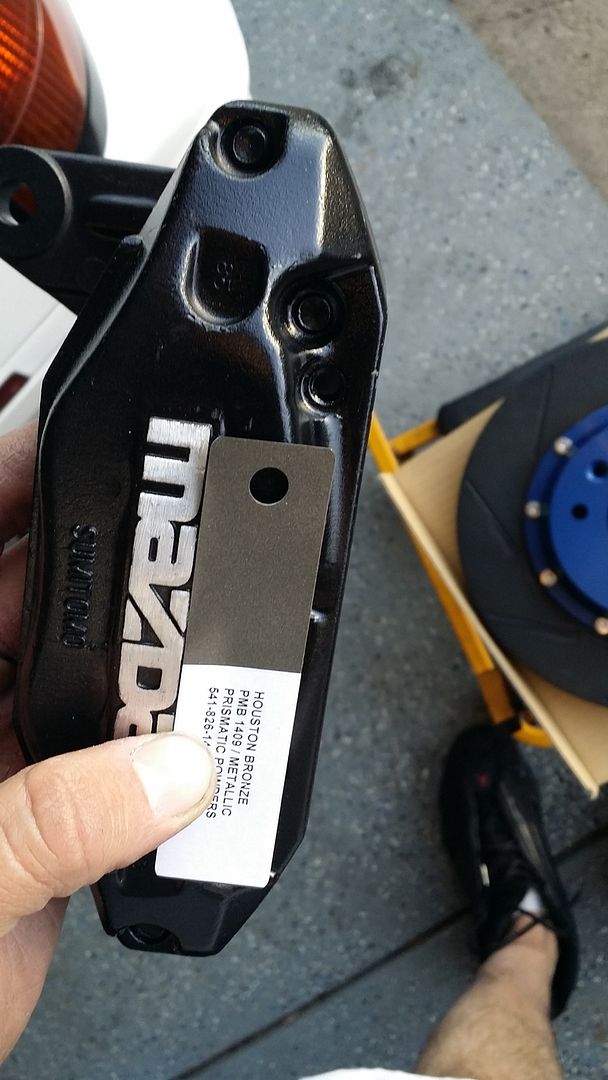
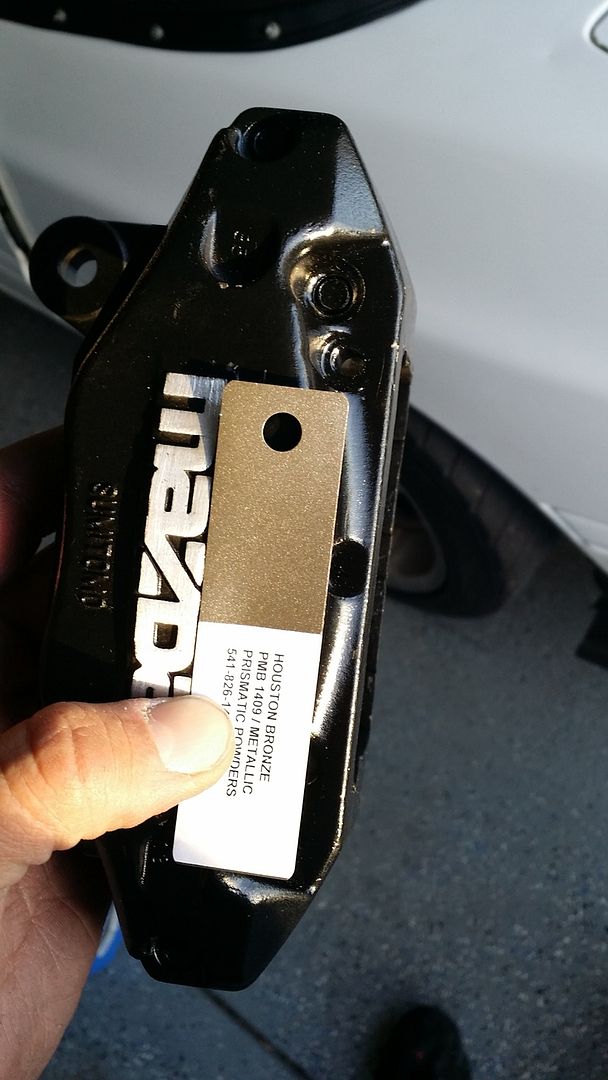
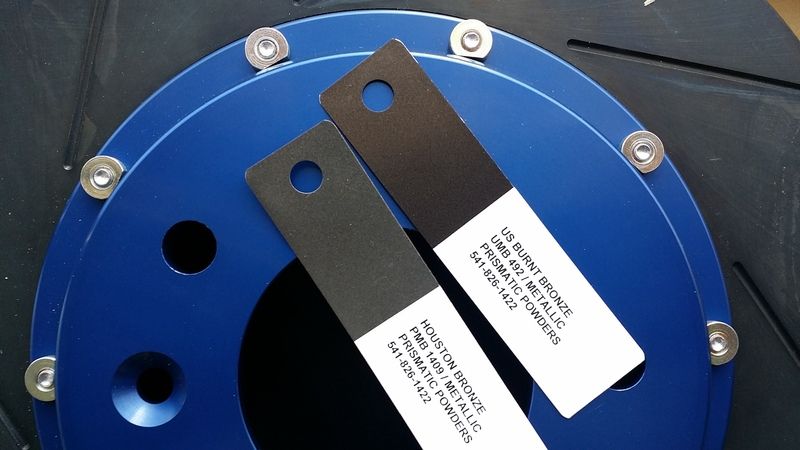
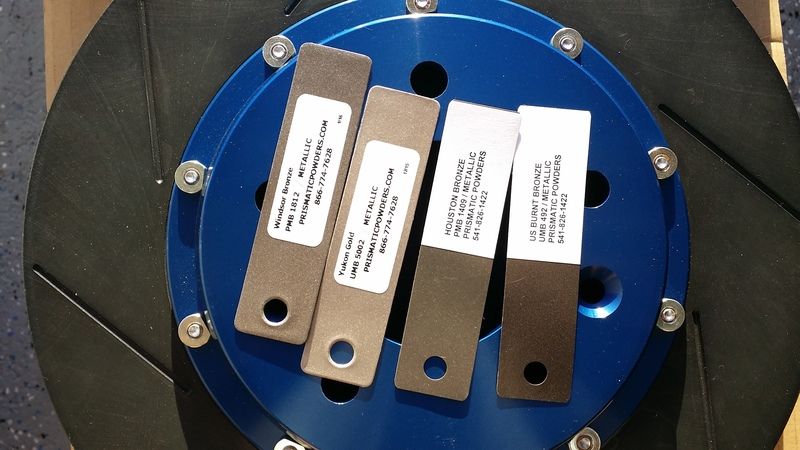
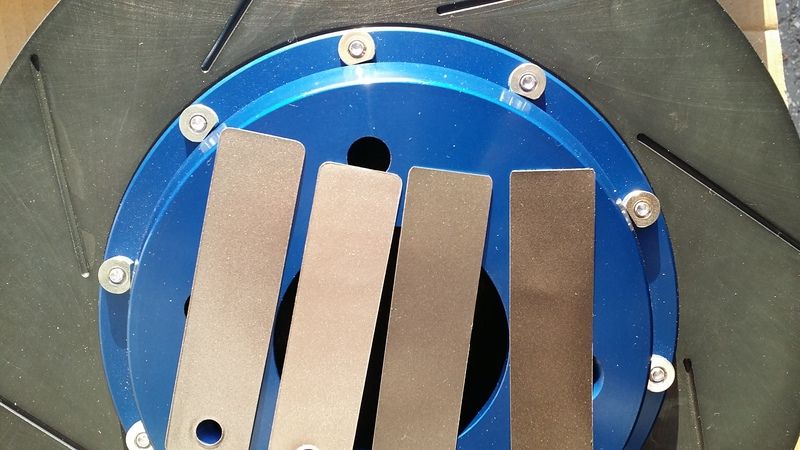
I got the powder coat swatches last week and the burnt bronze is still the best of that bunch, but I'm losing confidence in my choice of doing something other than charcoal or black or whatever, so I'm ordering more powder coat swatches hopefully tonight if it's not too late. I've already found some colors but I'd like to finish going through the pages first. Here are the ones I got so far compared to the rotor hat and the lettering on the calipers (I want it to be dark enough that they will still show).
Burnt Bronze in differing lighting...
Image
Image
Image

Houston Bronze...
Image
Image

Both on the rotor hat...
Image

Here are all the colors on the rotor hat before I narrowed it down...
Image
Image

I also came up with an idea for an intake filter airbox since I think it will be too difficult to fit a filter where I need to and even more difficult to get the pipe to fit. I'm going to get some construction cardboard tomorrow and cut out the pieces. It will use two air filters for a Victory Hammer motorcycle, and one air filter for a Bajaj Pulsar, and Indian motorcycle. Both are sold by K&N but I'm trying to switch to Amsoil filters.

I need to look into sway bar end links because the ones I got from Mazdatrix years ago are severely worn out. I'm not crazy about buying another set because they'll just wear out again, but it's taking me too long to look up different heim joints to use.

On the wheel front I'm still having issues finding a place to cut the faces. I stopped by Basic Machine again last week and sent him the file that afternoon but he couldn't view the file and I can't convert it to what he needs. Tom Beauchamp is getting me the information for a contact in China to cut the wheels for much cheaper, so that might be an avenue. But I started thinking that it might be a better idea to just widen my wheels like Andy did. The only issue is I'm not sure what the turnaround time will be on those and Chris is coming out in less than two months now. Also, if I start with a set that is the same size and offset front and rear I can rotate them when I need to. So I started thinking about getting a set of RPF1s and having them widened, but that's about $1000 for the wheels, and another $1000 most likely to get them widened, not including shipping, and another $1500 or so for tires. That puts me around $3500. Plus I really like the TM02 and want to stick with those, although the RPF1 is still an awesome wheel. So I started looking for a set of TM02s, but the only set I've found used are still around $2000. My best bet would be try to find two the same size as my rear ones and then send them all off, but I'd still need them back for Chris to tune. And since the wheels are about $500 new it would still cost the same as four RPF1s.

I'm going to borrow Jason's hoist again sometime soon to swap my engine mounts back to the Noltecs and install the Banzai tranny brace. I still need to get the manifolds and everything powder coated or ceramic coated.

I'm going to remove the rear bumper cover and replace it since it keeps getting the dimples in it. And I believe that's from the diffuser pulling down on it at higher speeds and it's contacting the frame and the bumper support. I'm going to drill into the bumper support and attach the mount bolts to that. I also need to get all the body work done on the body kit and diffuser, they're all in pretty rough shape.

I believe I'll be swapping the stereo for an Alpine with Apple Car Play and Android Auto, but they're around $1400. A guy on facebook works for a company called Optimus 5 and they just released a carpc called Smart Stream. He says it does everything I need, but I want to see videos first to confirm.

I think that's everything for the update lol.

User avatar
speedjunkie
Senior Member
Posts: 5292
Joined: Wed Jan 02, 2008 9:14
Location: Colorado Springs
Contact:

Re: Build thread

Postby speedjunkie » Tue Mar 08, 2016 9:14

I picked up some hardware today to make the bulkhead fitting for the battery ground to the engine block and assembled it tonight. I was going to make the cables tonight and install everything but I discovered I don't have enough of the right size terminals.
Image

I also drilled the hole for the bulkhead fitting and it turned out pretty crappy lol, but it'll work.
Image

I got the 3AN fittings for the wastegate actuator and the 4 port valve today. The guy at Turbosmart told me both ports on the actuator take the same fitting but I discovered tonight that's incorrect. He's going to check and get back to me with the right size.
Image

I got the rear hubs/knuckles today, they look to be in good shape. Time for blasting, possibly powder coating, and pressing the old bearing out and the new bearing in, as well as pressing in the ARP wheel studs. And most likely I'll need to get some open ended lug nuts to use with the ARP studs since they're longer and I may not be using a spacer.
Image
Image

I went to Whisler Bearing and had them make me a new oil feed line for the turbo. It's still not exactly what I thought I was getting, but it's close enough. Hopefully I got it the right length lol.
Image

While I was at Whisler I also picked up this bearing press kit, I figure I can use it for the suspension bushings too.
Image

I figured out an Amsoil air filter that should fit, I just have to change the angle of the filter a bit, which I'm hopefully will work to my advantage anyway. I also plan to drop my condenser a bit and use fiberglass to make ducting to all the pieces in the VMIC. I'm also getting the pre-filter, and I'm wondering if I should get a restriction indicator to show me when the filter needs to be cleaned. I found a K&N indicator on Autozone's website, I don't see why that wouldn't work.
All this will be much easier than the filter box.
http://www.performanceoilcompany.com/pr ... -EAAU4090/

I looked on eBay today for some interior parts and realized that what I thought I broke on the door plastic was actually part of the map pocket, which is notoriously hard to find in good condition, if you can find them at all. I saw one on eBay that already has the Bubble Tech lid, which I have and was going to swap out, and it's in good shape so I snatched it up right away. I really don't want to say how much it was lol, but suffice it to say it was ridiculous. There is a set of B pillar plastics with speaker covers too but they're ridiculous as well, so I'm holding off on those. Those aren't quite as hard to find, but I may not have a choice.

I remembered tonight that I need to hook up the two wires for water injection to the harness, but I have to figure out which wires they are. And I'll probably stop at Wal-Mart tomorrow and pick up a couple 6x9 speakers and some wiring to hook up the rear speakers.
Last edited by speedjunkie on Fri Mar 25, 2016 9:14, edited 3 times in total.

User avatar
Shadowden
Posts: 2288
Joined: Fri Aug 05, 2011 9:14
Location: Highlands Ranch
Contact:

Re: Build thread

Postby Shadowden » Tue Mar 08, 2016 9:14

Do you have a step drill bit? Might be a good way to clean up that hole and to drill future holes in the sheet metal.

User avatar
speedjunkie
Senior Member
Posts: 5292
Joined: Wed Jan 02, 2008 9:14
Location: Colorado Springs
Contact:

Re: Build thread

Postby speedjunkie » Wed Mar 09, 2016 9:14

Shadowden wrote:Do you have a step drill bit? Might be a good way to clean up that hole and to drill future holes in the sheet metal.


I might, I'm not sure, I'll have to check. But Zico and I installed the bulkhead fittings tonight so those holes don't matter anymore lol. And that's all I did tonight too. I got some more things from ACE today and discovered more things I have to order haha, what's new.

I got the 3.5" straight piece of stainless today so I can do the downpipe now, as soon as I get the turbo back from Andy. Then I can get that, the manifold and the turbine housing ceramic coated. I also got the MAC 4 port valve, I'll have to see where I want to mount that.

And a guy on 7club has what looks like some really nice hatch plastics and he has speaker covers too, although one of them is a bit broken around the edge in one place. That's better than just being able to see the speakers though, and it might not be too visible anyway. I'll figure something out.

I've started the hunt for a 2.0kw RX-8 starter to use for the modification. I'm torn whether I should buy a new starter or get a used one.

User avatar
speedjunkie
Senior Member
Posts: 5292
Joined: Wed Jan 02, 2008 9:14
Location: Colorado Springs
Contact:

Re: Build thread

Postby speedjunkie » Thu Mar 17, 2016 9:14

I've been working on the car like a mad man and have a lot to update but no time to cover everything. Hopefully I'll have some time this weekend, but probably not.

User avatar
RX-7 Chris
Posts: 7800
Joined: Tue Oct 02, 2007 9:14
Location: Colorado Springs
Contact:

Re: Build thread

Postby RX-7 Chris » Fri Mar 18, 2016 9:14

What the ETA looking like?
1984 RX-7 GSL-SE [size=84]My restomod project[/SIZE]


1964 Ford Galaxie 500XL flat black w/ white interior, 2 dr fastback, 390 thunderbird, C6 auto, 2500 rpm high stall converter, shift kit, AC, Holley 750 cfm

[size=100]RIP 1983 RX-7[/SIZE]

My Car Blog

User avatar
speedjunkie
Senior Member
Posts: 5292
Joined: Wed Jan 02, 2008 9:14
Location: Colorado Springs
Contact:

Re: Build thread

Postby speedjunkie » Fri Mar 18, 2016 9:14

Still not sure haha. I'm hoping within the next couple weeks, but there are some little things that won't be finished by then. For example, I'm having a hard time sorting the wheel situation, so the current ones will probably be going back on. Chris told me that Syvecs is releasing new software and firmware this week or next that includes 3D barometric compensation maps as opposed to the current 2D maps. So with any luck we can still do this through logs and sort the issue. Worst case I'll fly him out anyway.

FDEEZ
Senior Member
Posts: 235
Joined: Sun Aug 11, 2013 9:14
Location: Colorado Springs

Re: Build thread

Postby FDEEZ » Sun Mar 20, 2016 9:14

speedjunkie wrote:I figured out an Amsoil air filter that should fit, I just have to change the angle of the filter a bit, which I'm hopefully will work to my advantage anyway. I also plan to drop my condenser a bit and use fiberglass to make ducting to all the pieces in the VMIC. I'm also getting the pre-filter, and I'm wondering if I should get a restriction indicator to show me when the filter needs to be cleaned. I found a K&N indicator on Autozone's website, I don't see why that wouldn't work.
All this will be much easier than the filter box.


Skip the air filter and go JDM with some wire mesh clamped on your turbo :)

User avatar
speedjunkie
Senior Member
Posts: 5292
Joined: Wed Jan 02, 2008 9:14
Location: Colorado Springs
Contact:

Re: Build thread

Postby speedjunkie » Mon Mar 21, 2016 9:14

Yeah I think I'll pass on that lol.

I'm ticked though because I already messed up the filter. When I was putting the sock on it, it slipped out of my hands and in trying to catch it I smashed it down onto the mock engine and messed up part of the mesh on the outside. Oh well, the sock covers it up and I'll just put that part facing down, but it still makes me mad because it's brand new lol.


Return to “Rotary Vehicle”

Who is online

Users browsing this forum: No registered users and 36 guests