My 1974 REPU Project
-
speedjunkie

- Senior Member
- Posts: 5290
- Joined: Wed Jan 02, 2008 9:14
- Location: Colorado Springs
- Contact:
Re: My 1974 REPU Project
As frustrating as it is trying to find parts like that, it kinda makes it even better when you do find them lol. Like you're 20 times happier because it was such a challenge. And it's wild what super rare parts you'll find sometimes. I saw someone with practically brand new RX-2 tails not long ago, I think on facebook. Look on there for rare parts, you'd be surprised. Actually that might have been on RCC, I can't remember lol.
-
chickenwafer
- Posts: 2515
- Joined: Wed Mar 11, 2009 9:14
- Location: Greeley
Re: My 1974 REPU Project
speedjunkie wrote:As frustrating as it is trying to find parts like that, it kinda makes it even better when you do find them lol. Like you're 20 times happier because it was such a challenge. And it's wild what super rare parts you'll find sometimes. I saw someone with practically brand new RX-2 tails not long ago, I think on facebook. Look on there for rare parts, you'd be surprised. Actually that might have been on RCC, I can't remember lol.
Totally, finding rare or irreplaceable parts is quite a thrill. The only real problem is I'll find one of these rare parts pop up for sale, not be in a great position to buy it, but feel pressured to do so because the parts are so rare and hard to come by. Unlike with the FD, or certainly newer cars, parts specific for the REPU so rarely pop up for sale that you really do need to buy them when they do LOL.
Yesterday had a few minutes to wrench Bumblebee to got the fuel tank reinstalled. I think it cleaned up nicely, painted the exterior in DupliColor engine primer and then a few coats in DupliColor gloss black engine enamel. Reinstalled the fuel lever float sensor with new stainless screws as the originals were rusted out and I had to drill them out when removing the sender originally.

Got the tank reinstalled which wasn't too bad. Made up new fuel lines for the feed, return, and evap canister. Getting the filler neck hose on was a major PITA but eventually worked it on. Installed a brand new G12 fuel filter so we'll see if this tank works good now (fingers crossed)
Since I was in a working mood I decided to relocate the ignition switch from the steering column to the choke bracket since my new Weber style EMPI carb doesn't have any type of choke. I got this idea from a guy on the RX7club boards, think it turned out pretty good and makes it unique.
I started by removing the stupid-expensive-to-replace steering column plastics which are just about the good piece in the interior of my truck, haha, to get at the ignition switch and remove it and the bracket. You can see in the pic here I have removed the plastics and see the factory ignition switch location, the choke bracket is to the lower left of the column:

Didn't take many pictures of the process, but I removed the choke bracket, had to enlarge the hole for the ignition switch, threw a quick coat of black engine enamel on it, and reinstall. The factory wiring reaches no problem with just some simple re-routeing. Finished result:

A few of the brake parts arrived today, more tomorrow and then Tuesday. Hopefully next weekend everything will be here so I can get the brakes done. Going to get it registered and plated tomorrow and got a few more parts rolling in I'm pretty excited about, will update once they're here.
-
speedjunkie
- Senior Member
- Posts: 5290
- Joined: Wed Jan 02, 2008 9:14
- Location: Colorado Springs
- Contact:
Re: My 1974 REPU Project
That's why you need to save up in the times you're not doing any upgrades so you're ready to buy the REPU parts when they become available. Or something nice for the wife (only in case she's reading this) lol.
I like the ignition switch relocation. That's pretty cool!
I like the ignition switch relocation. That's pretty cool!
-
chickenwafer
- Posts: 2515
- Joined: Wed Mar 11, 2009 9:14
- Location: Greeley
Re: My 1974 REPU Project
speedjunkie wrote:That's why you need to save up in the times you're not doing any upgrades so you're ready to buy the REPU parts when they become available. Or something nice for the wife (only in case she's reading this) lol.
I like the ignition switch relocation. That's pretty cool!
Thanks dude, thought it turned out pretty cool. Nice part is it's easily reversible if I end up not liking it.
Got all the stuff in to do the brakes yesterday so I started that project.
First was replacing the master cylinder which I suspect is the main culprit for weak brakes and a mushy pedal.
I drained the OE master and removed it, lined up the new one and bolted it all in. Since new REPU masters are extinct I ordered one for a Ford Courier, the vehicle in which the REPU is entirely based, assuming it would bolt in. Well, it's pretty close, but not perfect. Had to bend one hardline, and the bore that enters the brake booster is just a hair larger at the base. So it isn't making a perfect seal at the booster which could cause issues.
Didn't take any before pics, it was just an old master, new one in,

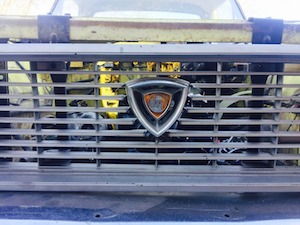
Took this picture after installing it as I noticed the front brake banjo bolt has the old school Mazda M logo embossed on the bolt. I thought it was pretty cool,

Next up was the rear drums. I know how drums work but I've never actually owned a vehicle with them before, so this was my first experience with drum brakes. Overall, not bad, but my biggest mistake was not knowing how to easily remove the old drum. I popped the wheel off, hosed it down in PB Blaster, removed the two phillips holding it to the hub, and then proceeded to bang the shit out of it with a rubber deadblow and try to pry it with a prybar for probably about 40 minutes before saying uncle.
I was seriously stumped and ready to give up when I was looking at the new drums and noticed a pair of threaded holes in them. Comparing to the old drums, they had them too, so I found two allen head bolts and use my impact to ram them in and presto, drum pops off. Wish I would have known that earlier!
Anyways, starting photo,

Drum off, the shoes don't actually look too bad at all,

This is the amount of dirt that fell off the truck when I was beating the drum for 40 minutes LOL. Not kidding thrre was dirt/mud nearly an inch thick at the axle flange. This thing must have been submerged in mud at some point.

Finished result,

What took me just over an hour to do on the first side took aboit 15 min on the other side once I learned the trick, haha. Ran out of time to do the front discs but I'll get them done this week.
-
RX-7 Chris
- Posts: 7800
- Joined: Tue Oct 02, 2007 9:14
- Location: Colorado Springs
- Contact:
Re: My 1974 REPU Project
looking good.
1984 RX-7 GSL-SE [size=84]My restomod project[/SIZE]
1964 Ford Galaxie 500XL flat black w/ white interior, 2 dr fastback, 390 thunderbird, C6 auto, 2500 rpm high stall converter, shift kit, AC, Holley 750 cfm
[size=100]RIP 1983 RX-7[/SIZE]
My Car Blog
-
chickenwafer
- Posts: 2515
- Joined: Wed Mar 11, 2009 9:14
- Location: Greeley
Re: My 1974 REPU Project
Thanks guys!
Well, the front brakes were a total fail. I thought I was all smart and ordered some Mazda B2000 front brake discs as they were 6 lug like the REPU and the same size, only vented as opposed to the REPUs non vented discs. Nice little upgrade, right? Nope, they didn't even come close to fitting. In fact, mkst of the front knuckle has be ripped apart to remove the disc, what a PITA. No one will obviously have REPU discs in stock and the new ones I ordered are probably too heavy to ship back cost effectively.
I pressed on bleed the brakes as best I could by myself today. Got the pedal stiffer than before but it's still not great. It goes about 5/8ths of the way thru it's travel before stiffening up. I'm going to go to Harbor Freight sometime this week to get their MittyVac rip off so I can do a proper brake bleed. The ebrake works so in an emergency I can grab that.
Also fixed the brake master with how it wouldn't fit in the booster. There is a little oring groove on the new master and I was looking around the garage and found the rubber orings I got with the new intake manifold gasket from when I installer the Weber IDA manifold. I didn't use them because I just plugged the coolant passages with freeze plugs. So i removed the master the rubber oring was basically a perfect fit into the little groove on the master cylinders bore that enters the booster. Success! No more leaks so I think I'm fine.
I also pulled the beyond beat bench seat to clean up stuff underneath and because I have some new racing buckets enroute! Kind of an impulse buy, but they're an exceptionally cheap drag racing/dune buggy poly molded bucket with provisions for 6 point harnesses. I bought just one and the seat mount to make sure that first, I fit in the seat, and then to see how they mount up. It will be too expensive to ship back so if it doesn't work I'll have to try and sell it locally. At least this way I'm only out 1 seat. Should be here tomorrow and I'll grt some pics up.
Lastly, got the car registered and plated last week. Between getting imsurance on it and plates, it was kind of comical. First, I had to get it insured, which the online site wouldn't let me do because it didn't recognize the VIN or even know of any Mazda produced before 1981 LOL. So I called. The woman was really nice but kinda confused. Basically I ended up having to insure it for a "declared value" because they have no reference for it. Which I guess is good so if it gets totalled my widow will get the amount I said it's worth LOL. Because no way I'm surviving an accident in which it gets totalled.
Last was the DMV, and again, the woman was nice but confused. I told her I had a 1974 Mazda to register as a collector car and she has a really confused face and even said "I didn't know Mazda cars made cars in the 70's!" All surprised like. Great haha. She studied the title like it was a forgery and then she asked me some questions;
"What color is it?"
Yellow
It's a truck?
Yes.
What's the model?
Rotary Pickup
What?
Rotary pickup
No, a model is a name usually, like Mustang or Camaro
That's all they called it, Rotary Pickup, Mazda left the car names to the building janitor in the 70's
She was throughly confused by this, even had another person come look at stuff on her screen. I ended up getting a title with no model listed LOL. I guess they didn't believe me. The process took so long I totally forgot I was goimg to be custom plates LOL. Oh well.
Well that's another entry in my little build, more to come with the race seats and a few more additions. If the seat fits I'm hoping to get it secured and then make it to Cars N Coffe Fort Collins this Sunday morning, assuming the brakes work worth a crap haha. We'll see.
-
speedjunkie
- Senior Member
- Posts: 5290
- Joined: Wed Jan 02, 2008 9:14
- Location: Colorado Springs
- Contact:
Re: My 1974 REPU Project
Well that sucks about the front brakes. What are you going to do now?
HF sells a legit Mityvac set. That's where I got mine.
What brand of seat did you get? Do you have a link?
That's a pretty funny story about the DMV lol. Do you think they would have taken the name REPU? Or maybe you should have called it a human name, like Derek, or Bob.
HF sells a legit Mityvac set. That's where I got mine.
What brand of seat did you get? Do you have a link?
That's a pretty funny story about the DMV lol. Do you think they would have taken the name REPU? Or maybe you should have called it a human name, like Derek, or Bob.
-
RX-7 Chris
- Posts: 7800
- Joined: Tue Oct 02, 2007 9:14
- Location: Colorado Springs
- Contact:
Re: My 1974 REPU Project
What year are the Mazda B2000 brakes?
1984 RX-7 GSL-SE [size=84]My restomod project[/SIZE]
1964 Ford Galaxie 500XL flat black w/ white interior, 2 dr fastback, 390 thunderbird, C6 auto, 2500 rpm high stall converter, shift kit, AC, Holley 750 cfm
[size=100]RIP 1983 RX-7[/SIZE]
My Car Blog
-
chickenwafer
- Posts: 2515
- Joined: Wed Mar 11, 2009 9:14
- Location: Greeley
Re: My 1974 REPU Project
RX-7 Chris wrote:What year are the Mazda B2000 brakes?
1982 IIRC. They are the same size but the REPU has the actual wheel hub bolt to the front of the rotor whereas the B2000 rotor sits ontop of the hub like a modern disc.
speedjunkie wrote:Well that sucks about the front brakes. What are you going to do now?
HF sells a legit Mityvac set. That's where I got mine.
What brand of seat did you get? Do you have a link?
That's a pretty funny story about the DMV lol. Do you think they would have taken the name REPU? Or maybe you should have called it a human name, like Derek, or Bob.
I'm going to have to see if I can exchange them without shipping being ridiculous. Problem with ordering parts online but no one local sells them so I'm kinda stuck.
So the past couple of time wrenching on the REPU was a complete fail.
First was the race seat. I ordered a Pro High Back II Poly seat from JEGS. http://www.jegs.com/i/JEGS-Performance- ... 0/10002/-1
The seat is stupid cheap at $40 bucks and is basically a nice arcade style game chair with provisions for harnesses. I know it won't be super comfortable but come on it's a 74 REPU nothing will be comfortable. It only weights about 11lbs and I fit in it! So I was pretty happy with that. But the bolstering wasn't that great, like I'd still slide around in it.
So I removed the bench, tried to clean up/vac the floor a little (found a lot of broken glass, but luckily no dead animal carcasses) and fitted the seat. It looks like it will work! But not really. Here's the seat just sitting on the floor without the mount, excuse the dirty floor:

The layback angle is 18*, which for the small cab of the REPU and my size is too much. In order for the seat to not press against the rear window, it has to sit too far forward in the ca which leaves no room for my legs, and puts my knees in the dash/steering wheel. I got a set of adjustable height seat mounts which I tried to test fit, but didn't have the correct hardware so it was just a mess. With the mounts loosely on the seat I positioned it in the cab and tried to sit in it, but since it was so loose it just moved around, and I got "stuck" and basically fell out of the cab haha, but ended up bending/twisting a seat bracket. So total fail.
There's a chance the seats could fit with some customization of the seat mount that gives it less layback angle so I can move them further back. But they get less and less comfortable with less angle, so it's a trade-off for sure. I cut my losses and put a blanket on top of the OE bench seat and pulled it thru so it looks a little nice and bolted it back in. I might revisit the seat later, but for now I'm sticking to the bench.
I was also planning on making Cars N Coffee in Fort Collins Sunday morning, so I wanted to take the truck for a spin to make sure everything was okay for this real drive. Poured in about 1.5-2 gallons of fuel into the freshly fixed and sealed tank. Try to start it up and the fuel pump isn't running. Check around the the fuse is blown. Replace it and the pump is now running, but it isn't pulling fuel or priming. I try to iniate a suction on the fuel feed and it's obviously plugged, I'm guessing with POR15 sealant. GREAT.
I tried blowing 120PSI of compressed air thru the feed hole and nothing. So it looks like I'll have to drop the tank, again, and try to stuff a coat hanger or something down there and breakup whatever blockage is down the feed hose. I'm guessing the vent tube and return tube are also blocked. From my quick research the POR15 sealant dries hard like a rock so I'm less than optimistic a coat hanger will do anything. But the tube is small and has bends, also in the corner of the tank without any direct access, so I'm kinda stumped. Other idea is to pour some paint thinner down the tubes and let it eat away the sealant, once it gets thru quickly empty the tank so the thinner doesn't compromise any other areas.
Anyways, looks like I'll miss Cars N Coffee but they'll be more.
-
chickenwafer
- Posts: 2515
- Joined: Wed Mar 11, 2009 9:14
- Location: Greeley
Re: My 1974 REPU Project
So today I dropped the fuel tank to investigate what was happening with the fuel pickup tube. Luckily I'm now almost a pro at dropping the fuel tank so I had it out in no time haha.
I started with trying to shove some rebar tie through the tubes (all three, the pickup, return, and vent) were all blocked. The rebar tie (Basically an unfolded coat hanger) was actually able to unclog both the vent and return, but the main feed was still completely blocked. Compressed air still couldn't unblocked it.
Next I tried to spray some aerosol based paint stripper down the tube and let it sit during lunch. Didn't do a thing, still plugged up. Damn.
So I dropped my borescope in the tank and confirmed my fears; the pickup tube drops all the way to the floor of the tank and it cut at a 45* angle. The POR15 sealer pooled around the pickup tube and completely shut it. Great. The good news and bad news; POR15 fuel tank sealant dries as hard as cement! No joke, the stuff it TOUGH as nails. There is no way to chip it away. Even aggressive paint stripper barely makes a dent. So that's good because I'm confident it will stand up for decades of use inside the fuel tank. Bad news; obviously, you aren't going to easily, or at all, remove it, it's permanent!
So at a crossroads; I could order POR15's stripper product to remove the sealant, which was questionable if it even would, and reapply the sealant again. Or I could cut out the pickup tube, clear the clog, and JB Weld it back in, or install a totally new pickup tube. I choose the ladder.
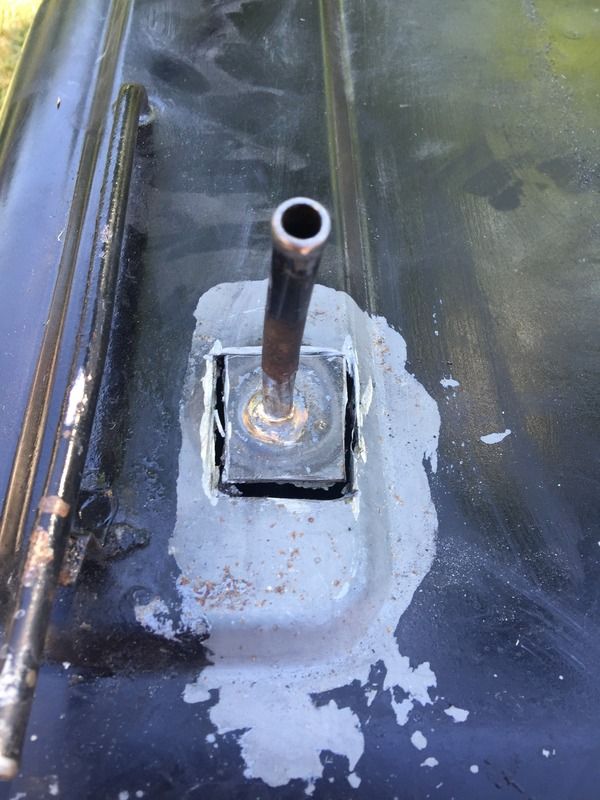
I emptied the tank of gas as best I could and took in my backyard with a garden hose at the ready in case it decided to catch fire. Using a die grinder I cut in a rectangle pattern around the pickup tube to remove it:
Just reinforcing how tough the POR15 is, I had to use vice grips to twist and pull with a lot of force to remove the pickup tube. And when it came out, I was greated with a completeld clogged shut pickup:
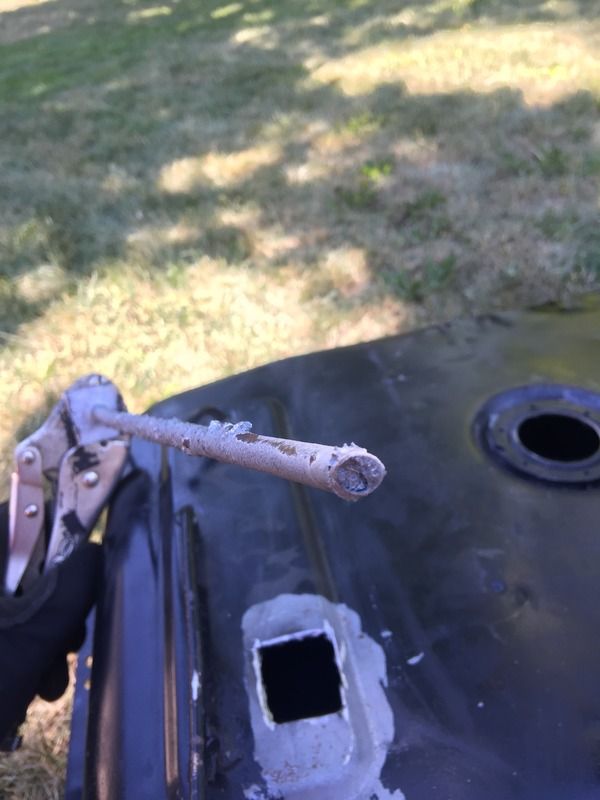
I had to use a drill bit to get all the POR15 out of it! then flushed it with paint stripper, ran rebar tie through it, and finally compressed air.
Here's a peak inside the tank where the pickup tube sat, you can see the fuel tank slopes to the pickup tube (obviously) so the POR15 sealant pooled around it:
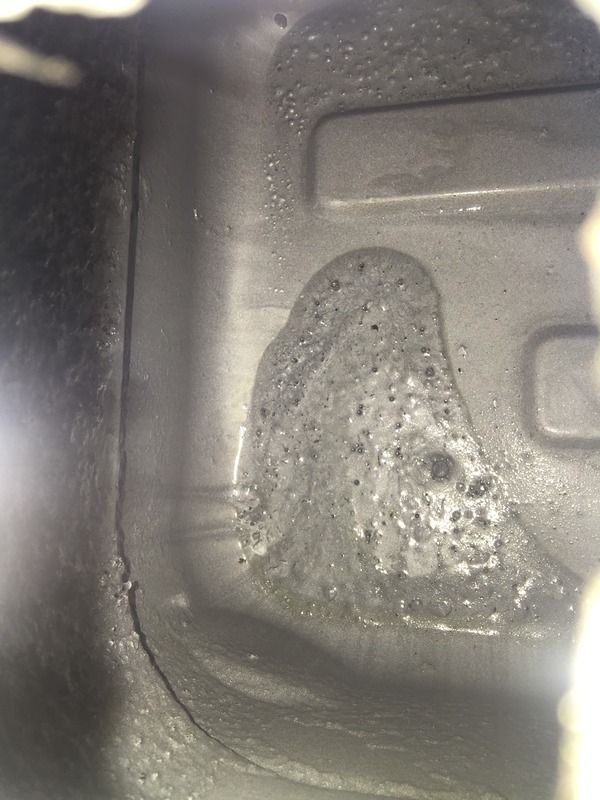
Finally, after a quick scuff of the metal on top of the tank, and stripping off the paint in the area, I bent the pickup tube slightly to direct it away from the area of pooled POR15 sealant so it wouldn't just sit in the high area again. I used some JB Weld Quick Steel putty to reattach the pickup as A, I don't have a welder, and B no way am I getting someone or welding a gas tank myself. Too many horror stories to feel comfortable with that!
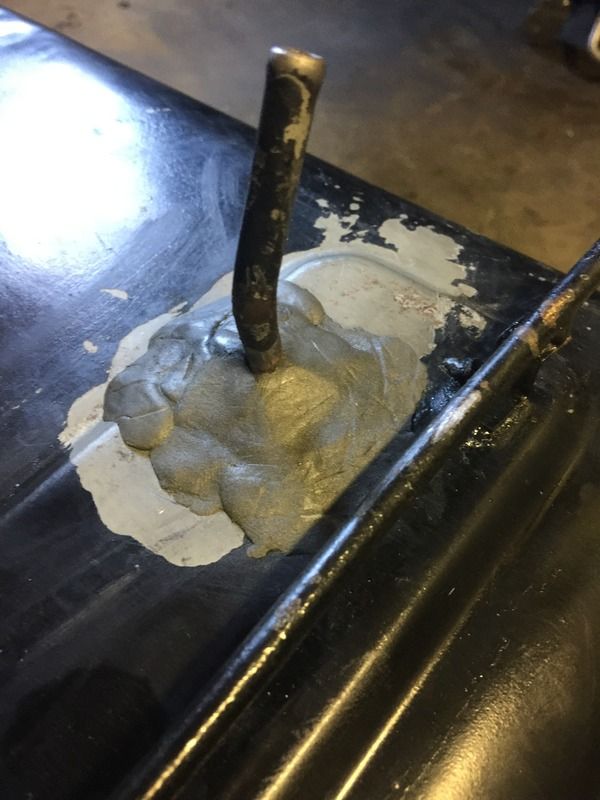
The JB Weld actually worked great, setup super quick and it's rock rock hard. I sanded it down a little and then after letting it setup/cure for about 70 minutes I threw the same VHT engine enamel black paint on it (didn't get a finished pic). Tank went back in no problem and I verified multiple times during the process that the pickup tube was clear by blowing into it. Success!
Throw in some gas and turn the key, I see some smoke from the engine compartment. Shit. The fuel pump fuse is blown and smoking! Fuel pump is obviously no working. I try replacing the fuse...new one goes out with a quick arc instantly. Great. I just want this to work! The fuel pump has never been a problem before what's changed? Nothing really.
I was beat and the kids needed to go to bed so I came back inside and will tackle the electrical tomorrow. Hopefully get the fuel pump wiring fixed and take it for a spin tomorrow.
I started with trying to shove some rebar tie through the tubes (all three, the pickup, return, and vent) were all blocked. The rebar tie (Basically an unfolded coat hanger) was actually able to unclog both the vent and return, but the main feed was still completely blocked. Compressed air still couldn't unblocked it.
Next I tried to spray some aerosol based paint stripper down the tube and let it sit during lunch. Didn't do a thing, still plugged up. Damn.
So I dropped my borescope in the tank and confirmed my fears; the pickup tube drops all the way to the floor of the tank and it cut at a 45* angle. The POR15 sealer pooled around the pickup tube and completely shut it. Great. The good news and bad news; POR15 fuel tank sealant dries as hard as cement! No joke, the stuff it TOUGH as nails. There is no way to chip it away. Even aggressive paint stripper barely makes a dent. So that's good because I'm confident it will stand up for decades of use inside the fuel tank. Bad news; obviously, you aren't going to easily, or at all, remove it, it's permanent!
So at a crossroads; I could order POR15's stripper product to remove the sealant, which was questionable if it even would, and reapply the sealant again. Or I could cut out the pickup tube, clear the clog, and JB Weld it back in, or install a totally new pickup tube. I choose the ladder.
I emptied the tank of gas as best I could and took in my backyard with a garden hose at the ready in case it decided to catch fire. Using a die grinder I cut in a rectangle pattern around the pickup tube to remove it:

Just reinforcing how tough the POR15 is, I had to use vice grips to twist and pull with a lot of force to remove the pickup tube. And when it came out, I was greated with a completeld clogged shut pickup:

I had to use a drill bit to get all the POR15 out of it! then flushed it with paint stripper, ran rebar tie through it, and finally compressed air.
Here's a peak inside the tank where the pickup tube sat, you can see the fuel tank slopes to the pickup tube (obviously) so the POR15 sealant pooled around it:

Finally, after a quick scuff of the metal on top of the tank, and stripping off the paint in the area, I bent the pickup tube slightly to direct it away from the area of pooled POR15 sealant so it wouldn't just sit in the high area again. I used some JB Weld Quick Steel putty to reattach the pickup as A, I don't have a welder, and B no way am I getting someone or welding a gas tank myself. Too many horror stories to feel comfortable with that!

The JB Weld actually worked great, setup super quick and it's rock rock hard. I sanded it down a little and then after letting it setup/cure for about 70 minutes I threw the same VHT engine enamel black paint on it (didn't get a finished pic). Tank went back in no problem and I verified multiple times during the process that the pickup tube was clear by blowing into it. Success!
Throw in some gas and turn the key, I see some smoke from the engine compartment. Shit. The fuel pump fuse is blown and smoking! Fuel pump is obviously no working. I try replacing the fuse...new one goes out with a quick arc instantly. Great. I just want this to work! The fuel pump has never been a problem before what's changed? Nothing really.
I was beat and the kids needed to go to bed so I came back inside and will tackle the electrical tomorrow. Hopefully get the fuel pump wiring fixed and take it for a spin tomorrow.
-
chickenwafer
- Posts: 2515
- Joined: Wed Mar 11, 2009 9:14
- Location: Greeley
Re: My 1974 REPU Project
so Bumblebee has been having ups and downs lately, as most projects do I suppose.
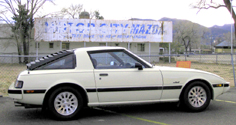
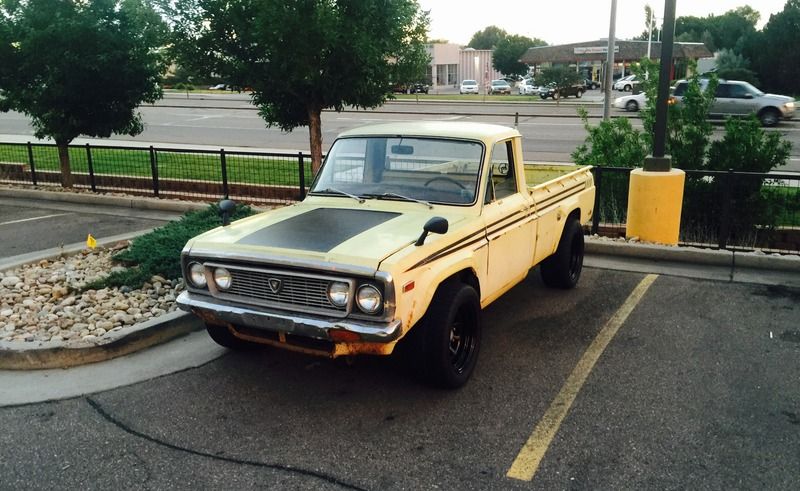
After the fuel tank and then fuel pump debacle, I finally got the pump running right and took Bumblebee on his first real drive down the street to the gas station. It made the trip without hiccup which was really cool! Also stopped amd snapped a quick pic:
Drove back fine, but still smoking. Not horrid, but it is. Also was hesitating at idle a little, which may be a timing or carb tuning issue. I'm honestly shocked I've been able to drive it on this carb with any real tuning. I can't got WOT or it tries to die, I cant tell if it's too rich or lean but guessing rich, just a hunch.
So it was running good though, would start up right away no problem. I even took my 3 yr daughter for a spin around the neighborhood without issue. Well, that was the first time. Next drive, the truck starts right up, then dies at a busy 4 way stop intersection. Oops. Had to push it out of the way. It struggled to restart but finally did and i was able to drive it back to my neighborhood before it died in my driveway and then refused to restart. Great.
Found out the fuel pump wasn't running, again, got it going by jiggling the fuse and finally got it in the garage but it's now running real rough and stumbling a lot. I put the battery on the charger overnight and the next day go out to try and sort the issue. Fuel pump is running so I'm guessing I got it fixed but the fuel pressure gauge is now reading around 2.5psi instead of 6. Kinda odd.
Try to start and it's super hesitant like before. Usually I was amazed at how easily this thing would fire up, just a few spins and it would roar to life. Wouldn't even have to feather the throttle normally. But now it just doesn't want to light off, playing with the throttle finally gets it going but idle is rough, almost like it's running on one rotor but it's at 900rpm. Fuel pressure still low. Won't let me put it in gear or it dies.
So it's obviously either a fuel related issue or ignition. I haven't messed with the ignition system at all, amd the only thing I've done with the fuel system is reinstall the fuel tank. But it drove fine multiple times after reinstalling the fuel tank so who knows. Pump is getting fuel to the carb but the pressure is lower. And with the weird electrical issues that just started happening with thr fuel pump I'm guessing the pump isn't receiving full and/or consistent voltage. So I'm goimg to do a simple rewire of the pump straight off the battery with a 5 pin relay and a simple switch with integrated LED so I don't accidentally leave it on. This will get full voltage to the pump reliably.
That's it for now, my goal is to make Cars N Coffee in Fort Collins at the end of the month. Still need to bleed the brakes, patch the rust hole in the passenger floorboard, and maybe hopefully do an exhaust system.
After the fuel tank and then fuel pump debacle, I finally got the pump running right and took Bumblebee on his first real drive down the street to the gas station. It made the trip without hiccup which was really cool! Also stopped amd snapped a quick pic:

Drove back fine, but still smoking. Not horrid, but it is. Also was hesitating at idle a little, which may be a timing or carb tuning issue. I'm honestly shocked I've been able to drive it on this carb with any real tuning. I can't got WOT or it tries to die, I cant tell if it's too rich or lean but guessing rich, just a hunch.
So it was running good though, would start up right away no problem. I even took my 3 yr daughter for a spin around the neighborhood without issue. Well, that was the first time. Next drive, the truck starts right up, then dies at a busy 4 way stop intersection. Oops. Had to push it out of the way. It struggled to restart but finally did and i was able to drive it back to my neighborhood before it died in my driveway and then refused to restart. Great.
Found out the fuel pump wasn't running, again, got it going by jiggling the fuse and finally got it in the garage but it's now running real rough and stumbling a lot. I put the battery on the charger overnight and the next day go out to try and sort the issue. Fuel pump is running so I'm guessing I got it fixed but the fuel pressure gauge is now reading around 2.5psi instead of 6. Kinda odd.
Try to start and it's super hesitant like before. Usually I was amazed at how easily this thing would fire up, just a few spins and it would roar to life. Wouldn't even have to feather the throttle normally. But now it just doesn't want to light off, playing with the throttle finally gets it going but idle is rough, almost like it's running on one rotor but it's at 900rpm. Fuel pressure still low. Won't let me put it in gear or it dies.
So it's obviously either a fuel related issue or ignition. I haven't messed with the ignition system at all, amd the only thing I've done with the fuel system is reinstall the fuel tank. But it drove fine multiple times after reinstalling the fuel tank so who knows. Pump is getting fuel to the carb but the pressure is lower. And with the weird electrical issues that just started happening with thr fuel pump I'm guessing the pump isn't receiving full and/or consistent voltage. So I'm goimg to do a simple rewire of the pump straight off the battery with a 5 pin relay and a simple switch with integrated LED so I don't accidentally leave it on. This will get full voltage to the pump reliably.
That's it for now, my goal is to make Cars N Coffee in Fort Collins at the end of the month. Still need to bleed the brakes, patch the rust hole in the passenger floorboard, and maybe hopefully do an exhaust system.
-
speedjunkie
- Senior Member
- Posts: 5290
- Joined: Wed Jan 02, 2008 9:14
- Location: Colorado Springs
- Contact:
Re: My 1974 REPU Project
Good. Freaking. Grief. Those issues reappearing and repeating all the time would drive me absolutely bonkers. Actually I'm pretty sure it's happened to me at some point and it DID drive me bonkers haha. Glad you got it going though, hopefully soon you can be at the point where everything just works and you can enjoy it.
-
chickenwafer
- Posts: 2515
- Joined: Wed Mar 11, 2009 9:14
- Location: Greeley
Re: My 1974 REPU Project
Not much updates here lately. Been pretty busy with work and life in general raising two kids.
I rewired the fuel pump thinking that could be the problem with the truck running rough but no change. I'm not sure if it's fuel or ignition related at this point. Not really sure what to test or where to start as NA rotaries aren't my wheelhouse.
In the downtime I've been kicking around an idea and now I'm pretty much sold on it- FC TurboII swap. The T2 engines don't come up on eBay often, but they usually aren't as pricey as the REW variants. So, that being said, I've pretty much decided on a TurboII swap for the following reasons;
-Turbo powwa!
-I know how to tune/wrench/fix/modify turbo/EFI rotaries MUCH better than NA rotaries
-Much larger power potential
-EFI so altitude adjustments aren't a problem
-Pretty darn close to the same cost as rebuilding my current motor, Bridgeporting it, manual trans swap, ign upgrade, etc, especially when factoring in I have some parts to sell
So as of now (plans are always subject to change!) I'm going to drop in a stock TurboII S4 or S5 engine and trans. The stock turbo will fit, barely, the clear the frame rail. Big swap hurdles;
-Turbo2 trans is a tank so I must keep it to hold the power but it's longer than the stock tranny. The tailshaft can either be modified to relocated the shifter forward in the correct location, or another REPU owner who did this swap modified the motor mounts to shift the engine engine forward a few inches so he didn't have to modify the tailshaft.
-The Turbo2 trans is longer than the stock gearbox so I'll need to get a custom driveshaft made. Luckily there's a good place in Greeley that will do it for about $300 bucks. This might not be a problem if I can do the whole slide the engine forward mounting method. Not sure on this yet.
-I'll still need to source a unicorn- REPU OE clutch pedal assembly. I'll also need a clutch master but those are easy. Clutch pedal is IMPOSSIBLE. I may to rig up something. Not sure on this yet.
-The Turbo2 engine will drop in with the REPU front cover and oil pan. I'll have to drill & tap the REPU front cover for the turbo oil drain and cover the dizzy hole
-I'll add an external EFI fuel pump to replace the current low press carb pump. This is easy. May sump the tank or add an in-tank EFI pump later if fuel starvation becomes a problem.
-As of now the plan is to get a STOCK Turbo2 engine in and running on the stock fuel system, turbo, top mount intercooler, etc. Because of the TMIC I'll add some sort of universal hood scope and rivet it on the hood. It's a rat rod so it doesn't have to look perfect (in fact, I don't want it to). This will only become a problem when I inventively go front mount and big turbo LOL.
-I can upgrade in stages just as an FC can; looking around it seems popular to do a BNR rebuilt turbo, upgraded injectors and RTEK ECU. I may go this route and add water/meth as well. Anyone know how much power the BNR snails can push? There website seems MIA, hopefully they aren't. Basically wondering what's the max power I can make on a stock-looking setup?
Well, that's pretty much it. I feel pretty good about this route to take the REPU. I'll miss the nostalgia of Webers but once the turbo spools I'm sure I'll get over it LOL.
-
chickenwafer
- Posts: 2515
- Joined: Wed Mar 11, 2009 9:14
- Location: Greeley
Re: My 1974 REPU Project
Small design updates,
So fc turboII engine are generally more difficult find, and combimed that I know less about them than the FD REW, they are also capable of less power than the REW, and the REW has larger stock ports. I've always wanted to go REW, but I had concerns about the factory twin turbos fitting between the engine and frame rail.
So I convince Matt to bring over a spare set of FD twin he had laying around (actually think they came off my old FD lol) so I could test fit them. First, I had to remove the hateful thermal reactor/manifold off the REPU. Didn't really take any pictures of this because it was too annoying amd I got so dirty. The underside of this REPU was obviously sunk in mud at some point because it's positively COATED in mud. Sucks.
Anyways, with the intake manifold and thermal reactor off, I could test fit me some twins;
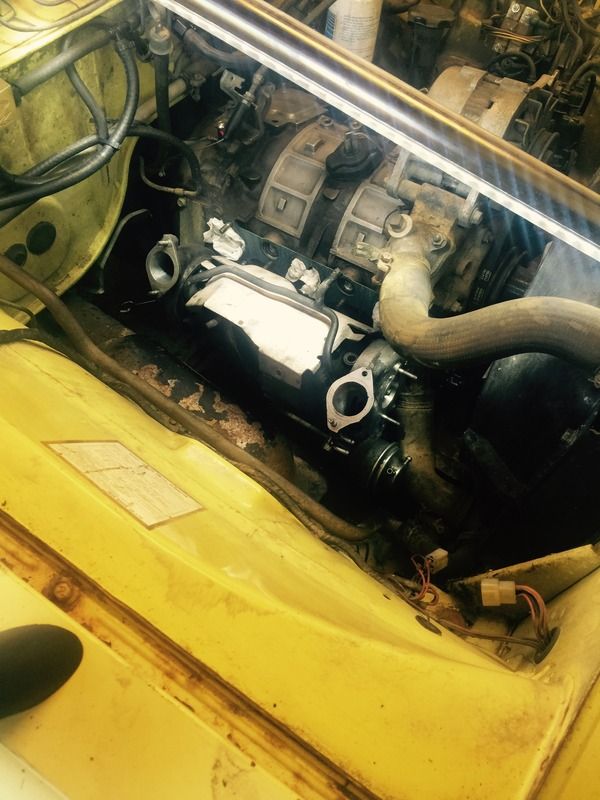
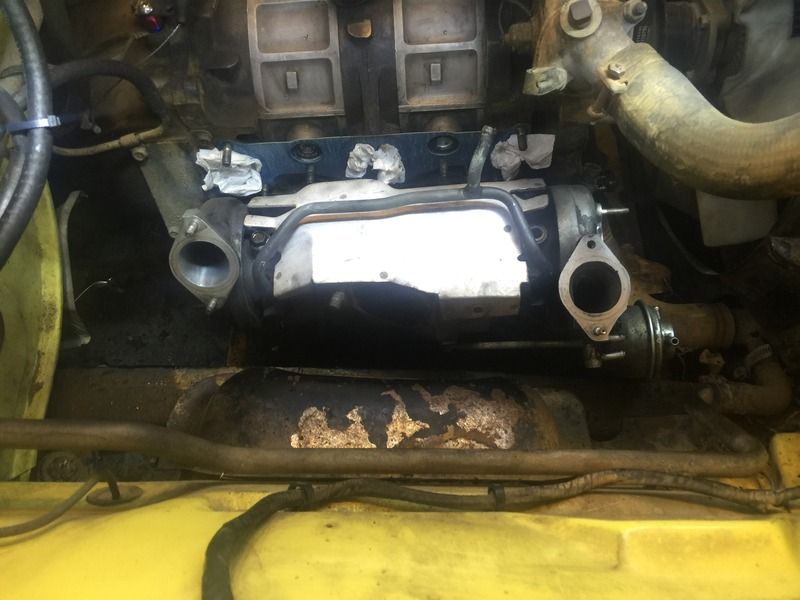
THEY FIT!!
A quick couple design challenges;
I had to remove the secondary turbos wastegate actuator as the can was fitting the frame preventing them from bolt up. I think this will be easy to make an extension bracket of sorts to move the wastegate actuator so it clears, and then simply bend the arm. I don't forsee this becoming a big deal.
The bigger deal is the exhaust/downpipe outlet. As you can see from the pictures, it's basically pointing straight at the fender. A tight radius pipe should make the bend ok, but then the pipe has no where to go because the rear/secondary turbos compressor housing is taking up all the space between the firewall and the exit to the ground. I will have to get creative here, exhaust might even have to exit into the fender well and then down and around to the undercarriage. I think there's enough clearance for a 3" pipe but I certainly won't be able to lower the truck any.
Overall pretty stoked that the REW engine should fit with the sto m seq twins. Time to find a jdm crate motor (amd sell some REPU engine parts).

Re: My 1974 REPU Project
Dude a Twin turbo REW on that truck is going to be so much fun!!! Can't wait to see it finished.
Who is online
Users browsing this forum: speedjunkie and 120 guests