2005+ Switchblade

The How-To Forum
User avatar
GR-8
Posts: 5335
Joined: Thu Oct 11, 2007 9:14
Location: Denver/ Lakewood
Contact:

Postby GR-8 » Tue Dec 25, 2007 9:14

This is a simple mod for those of you that have the switchblade key/fob for your Zoom-Zoom. As many of you know, this key rattles like there's no tomorrow. A DIY on an 8 forum has a fix but it's not that great. This fix will stop that loud rattling.

Steps to be taken:

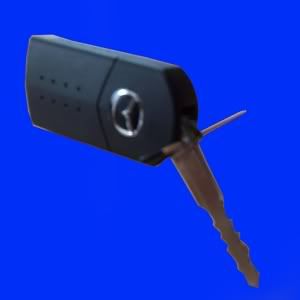
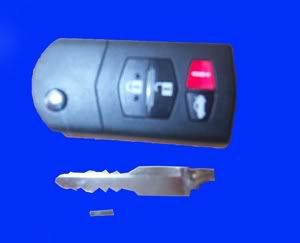
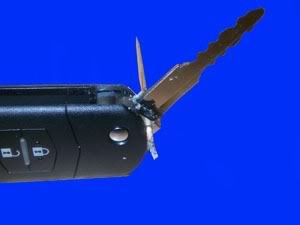
1) Take apart the key from the fob. This is simply done by holding the key perpendicular to the housing.There is a little black spot or "pin" that is holding the key to the "rotational device."
Image
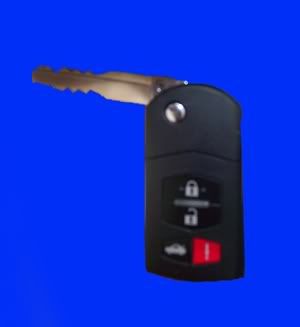
Simply use the screwdriver or toothpick (or what have you) and push this pin out. Be careful not to send it flying because it is easily lost. The key is now free from the device.
Image Image

2) This step requires the use of a candel and fire. Do this in a controlled environment. I am not to be held responsible if you burn the place that you are attempting this mod at down. :D Start off by either lighting the candle or cutting a peice of wax off. Once the candel has meltted a sufficient amount of wax figure out a way to hold the fob uprigth. It's a little tricky if your only using a peice of wax rather than a whole candle.
Image
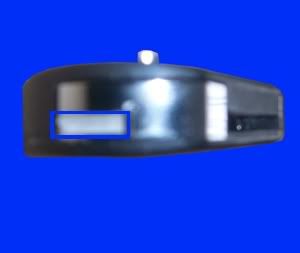
Now poor some wax into the..."Pit"...where the key goes. Do not fill the pit all the way up or the next step will be a pain. Half way would be sufficient.
Image

3) The third step is to get the key back into the socket. "Well how do you do that smart one?" you ask. Simple....take the key blade and heat the bottom of it up. Don't heat it too long or you'll burn your fingers.
Image
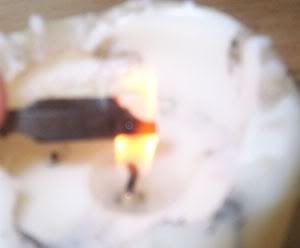
While the blade is hot shove it back into the pit. Wax should spew out the edges but that's ok, we can clean it up later. You have to make sure that you push the key all the way down. Stick the toothpick or screwdriver (or what have you) throught the whole where the black pin goes to clear out any wax. (If you did not get the key all the way down restart from the top of step 3.)
Image

Now that the wax is cleared of the hole replce the little black pin, clean up any excesse wax and enjoy your rattle free key. :D
Image
Image

ImageImage

User avatar
tsx_guy
Senior Member
Posts: 7438
Joined: Wed Sep 19, 2007 9:14
Contact:

Postby tsx_guy » Tue Dec 25, 2007 9:14

nice write up dude, but I am going to need to see the promised pics....as I started getting lost on step one... :)
"20<cut off="">"</cut>

User avatar
GR-8
Posts: 5335
Joined: Thu Oct 11, 2007 9:14
Location: Denver/ Lakewood
Contact:

Postby GR-8 » Tue Dec 25, 2007 9:14

<div class='quotetop'>QUOTE (6i_guy @ Dec 25 2007, 01:15 PM) [url=index.php?act=findpost&pid=15310]<{POST_SNAPBACK}>[/url]</div>
nice write up dude, but I am going to need to see the promised pics....as I started getting lost on step one... :)[/b]


I took all the pics and am currently editing them for upload.

Patient you must be for greatness to come.
Image


ImageImage

User avatar
tsx_guy
Senior Member
Posts: 7438
Joined: Wed Sep 19, 2007 9:14
Contact:

Postby tsx_guy » Tue Dec 25, 2007 9:14

<div class='quotetop'>QUOTE (Greek8 @ Dec 25 2007, 01:16 PM) [url=index.php?act=findpost&pid=15312]<{POST_SNAPBACK}>[/url]</div>
I took all the pics and am currently editing them for upload.

Patient you must be for greatness to come.[/b]


do or do not...there is no try.... :lol:

patience is a virtue, one I have yet to master....
"20<cut off="">"</cut>

User avatar
GR-8
Posts: 5335
Joined: Thu Oct 11, 2007 9:14
Location: Denver/ Lakewood
Contact:

Postby GR-8 » Tue Dec 25, 2007 9:14

Ok. Now that the festivities are over here are the promised pics for this DIY.


Do they help with much Guido. If not you should get somebody to help you. Your another reason there is a hidden disclaimer in the instructions.
Image


ImageImage

User avatar
tsx_guy
Senior Member
Posts: 7438
Joined: Wed Sep 19, 2007 9:14
Contact:

Postby tsx_guy » Tue Dec 25, 2007 9:14

looks good......
"20<cut off="">"</cut>

Huzer21

Postby Huzer21 » Wed Dec 26, 2007 9:14

Good job on the DIY. I've contemplated getting the switchblade for my car, but decided against it.

User avatar
GR-8
Posts: 5335
Joined: Thu Oct 11, 2007 9:14
Location: Denver/ Lakewood
Contact:

Postby GR-8 » Thu Dec 27, 2007 9:14

<div class='quotetop'>QUOTE (Huzer21 @ Dec 26 2007, 03:23 PM) [url=index.php?act=findpost&pid=15392]<{POST_SNAPBACK}>[/url]</div>
Good job on the DIY. I've contemplated getting the switchblade for my car, but decided against it.[/b]

Thanks, and may I ask why you opted to not get the switchblade?
Image


ImageImage

SpeedRacer
Posts: 5030
Joined: Wed Sep 19, 2007 9:14
Location: Aurora
Contact:

Postby SpeedRacer » Thu Dec 27, 2007 9:14

Cause he's not cool.
Heavy duty adjustable dog leashes
http://www.TitanTuff.com

User avatar
GR-8
Posts: 5335
Joined: Thu Oct 11, 2007 9:14
Location: Denver/ Lakewood
Contact:

Postby GR-8 » Thu Dec 27, 2007 9:14

Seems like it.

(Comic Book Guy voice) Only cool people have '05 parts on an '04. Especially if it's a switchblade.
Image


ImageImage

Huzer21

Postby Huzer21 » Thu Dec 27, 2007 9:14

I might eventually get it, I just didn't like the price of getting one, to be honest. I may still end up snagging one down the road. Until then, I figure I'll be "retro" and have an old skool key with a seperate remote fob. Haha.

User avatar
GR-8
Posts: 5335
Joined: Thu Oct 11, 2007 9:14
Location: Denver/ Lakewood
Contact:

Postby GR-8 » Thu Dec 27, 2007 9:14

$270 is a steep price for it but on Ebay a brand new switchblade only costs $40-$50. I can vouch for the quality. The guy to buy from is MidwestKeyless. My key was cut wrong at ACE hardware and after asking midwest if they sold blanks they sold mef blanks for $10 where as mazda wanted $40 for one blank and that included cutting. I got it cut for free at a locksmith down on broadway and elsworth. Works like a beauty.
Image


ImageImage


Return to “DIY”

Who is online

Users browsing this forum: No registered users and 93 guests