I doubt you'll get much opinion on the BOV issue on this site. Post about it on 7club if you REALLY want some opinions haha.
One thing to think about with that single huge oil cooler...if you're still going to use the stock bumper, you're still going to have only so much cooling area. You could always put a small fan on the back of it though.
Also, when you mount the thermostat, make sure it's in there the correct way. I think mine might be backwards, which MIGHT explain my oil burning problems. I'm doing some more research on it though before I change it. I've only seen a couple people say it's wrong but I've seen it mounted the same way on other's cars so I'm not sure.
My new car!
-
speedjunkie

- Senior Member
- Posts: 5365
- Joined: Wed Jan 02, 2008 9:14
- Location: Colorado Springs
- Contact:
-
eliminster
- Senior Member
- Posts: 202
- Joined: Mon Aug 22, 2011 9:14
- Location: colorado springs
The whole blow off valve or no blow off valve is kinda moot if you look over to Australia since none of the high hp 7's there run them, like you said just one more thing to break or leak air. I kinda don't like mine anymore after all the adjustments i had to make to it to get it to work up at this altitude vs down at Georgia. I loved the way it sounded down there now it sounds a lot softer and likes to flutter the valve a lot more and I agree that it is very hard to get the turbo to make a fluttering sound unless you have it improperly setup and running in surge constantly.
87 red rx7
running 13b re cosmo motor
03 yellow wrx
yes it is a stock color
00 black s10 zr2
yes i have it to tow cars when they break.
running 13b re cosmo motor
03 yellow wrx
yes it is a stock color
00 black s10 zr2
yes i have it to tow cars when they break.
-
chickenwafer
- Posts: 2515
- Joined: Wed Mar 11, 2009 9:14
- Location: Greeley
Eric- can you post pictures of how your thermostat is mounted? Do you mean how the lines are run to it or how it's physically mounted, because I wouldn't thinking mounting it in any certain orientation would be a big deal? Obviously the thermostat has a flow path so it needs to be hooked up properly for that.
eliminster- I agree. I think I'll hold off on the BOV and see what happens. I'll keep it for a little bit so if I need to I can install it or sell it later down the road. Anyone want a brand new, never used TiAL 50mm Q BOV with all fittings? Hehe
eliminster- I agree. I think I'll hold off on the BOV and see what happens. I'll keep it for a little bit so if I need to I can install it or sell it later down the road. Anyone want a brand new, never used TiAL 50mm Q BOV with all fittings? Hehe

-
speedjunkie
- Senior Member
- Posts: 5365
- Joined: Wed Jan 02, 2008 9:14
- Location: Colorado Springs
- Contact:
My BOV used to flutter all the time, then I changed the spring and it went away.
Here is the post that explains it. I did some more research and they said it needed to be this way too. I changed it tonight but I didn't drive the car. I did start it for the first time since being back and it fired right up. WOOHOO!!
http://www.rx7club.com/showpost.php?p=10928355&postcount=33
Here is the post that explains it. I did some more research and they said it needed to be this way too. I changed it tonight but I didn't drive the car. I did start it for the first time since being back and it fired right up. WOOHOO!!
http://www.rx7club.com/showpost.php?p=10928355&postcount=33

-
chickenwafer
- Posts: 2515
- Joined: Wed Mar 11, 2009 9:14
- Location: Greeley
-
chickenwafer
- Posts: 2515
- Joined: Wed Mar 11, 2009 9:14
- Location: Greeley
Did some minor work on the FD this afternoon. I changed my mind on getting the alternator case chromed (due to a number of things, mostly to keep the theme cohesive and most chromers are on a massive back-order for some reason) so I painted it in the same wrinkle black finish as the UIM/LIM/TB/Elbow. I'm getting it reassembled this afternoon, so I'll get some pics up then.
I also removed the coolant overflow bottle since I won't need it anymore to free up some space. I was hoping to run a flexible hose from my turbo thru the hole to the bottom corner where a second oil cooler would normally be for a cold air intake, but there is no way to get even a 3" intake hose, let a 4" intake hose like my turbo inlet, without cutting parts of the frame, which I'm not cool with.
So after getting over that idea, I decided to start tucking/relocating the chassis harness. I moved the fan relays and bracket to where the empty space where the second oil cooler would normally be, and bolted the bracket to a free stud leftover from the coolant overflow bottle. I think it looks really nice now (pics shortly).
Although now I'm left struggling how to tuck/relocate/clean-up the fuse block and stuff on the driver side. The passenger side looks so good now and the driver side looks ugly haha. There isn't as much slack on those are to move them, plus I'm putting a big ### single oil cooler on the driver side, so space is limited. Plus, I want easy access to the fuse box in case of needing to change a fuse.
-
SecondGenPAt

- Posts: 308
- Joined: Sun Apr 17, 2011 9:14
- Location: Jincheon, South Korea
arghx knows what he's talking about, but the idea of not running any type of boost spike control worries me.
To be honest, I'm with this guy:
http://www.rx7club.com/showpost.php?p=9770624&postcount=22
-Pat
To be honest, I'm with this guy:
http://www.rx7club.com/showpost.php?p=9770624&postcount=22
-Pat
Hakuna Matata
-
speedjunkie
- Senior Member
- Posts: 5365
- Joined: Wed Jan 02, 2008 9:14
- Location: Colorado Springs
- Contact:
Alright, I fixed it. I always forget to post the damn link haha.
I swapped the thermostat. We went for a fun drive today and after I romped on it several times it wasn't even smoking anymore. Later it was smoking again, but it's not near as bad now. So I'm not sure what's up. Maybe the thermostat thing fixed it, not sure.
Um, you're deleting your overflow tank? Why will you not need it? Are you referring to the AST deletion? I still use my overflow tank, I just don't have the AST anymore and the only real reason I deleted it is because I CAN'T use it with my radiator.
As far as relocating the fuse boxes on the driver's side, I've seen a lot of people move them to the rear bin where they have their battery, but I have no idea how they did it and as much as I hate wiring I can't imagine actually taking on that task haha.
Oh, and yes, I'm back haha. I got back on Wed night.
-
chickenwafer
- Posts: 2515
- Joined: Wed Mar 11, 2009 9:14
- Location: Greeley
Thanks for the link, Pat. Still undecided on the whole issue, tho.
Eric- good info on the thermostat. I will have to make sure mine is installed correctly haha. Yeah, I deleted the AST and the overflow tank. I don't see much of a need for it. It only fills when coolant boils over past the rad cap. I will still have a hose off the rad cap overflow but just run it down to the ground, so it will just vent to the ground. This is what I did on my RX-8 and it worked fine (it's also how the RX-8 is setup stock haha).
I thought about relocating the fuse block to the trunk or something, but that's WAY too much wiring for me haha, not happening. I saw 7club username "prew" build thread and he just simply pushed the fuse block to down in front of the wheel. Not much (if any) wiring required. Only problem is, if you blow a fuse or need access to the fuse block, you might have to remove the front bumper.
Edit: Oil cooler from eBay just showed up. It's big, and without a lot of work, I'm not sure how it will fit. It's 15" long, 8" tall, and 2.75" thick. It's just too large so I'm going to see how much "hacking" it will take to get it to fit, otherwise it might be possible to get a section cut out of it and welded up so it's shorter. Shouldn't be difficult to get an easy 2" chopped out of it, and a radiator shop should be able to do it for a reasonable price.
The other option would be to mount it either to the intercooler or radiator front, inside the v-mount. I was thinking the radiator since oil and water temps should be pretty much in-line with each other, I don't think it would cause any issues with water temps. We'll see.
-
speedjunkie
- Senior Member
- Posts: 5365
- Joined: Wed Jan 02, 2008 9:14
- Location: Colorado Springs
- Contact:
Well someone else in that thread said that they had read that the thermostats changed at some point and it was opposite before that. I'm not sure how true that is though. I might just contact Mocal and ask. Otherwise, it might just be easier to take it out again and make sure it's installed correctly according to the internals, but I really don't feel like doing that haha.
You're talking about Steve Prew? I think he's one of my friends on fb now too lol. His car is gorgeous!
If you end up having to modify that oil cooler, is it still going to be financially feasible vs selling it and getting a smaller one? lol
You're talking about Steve Prew? I think he's one of my friends on fb now too lol. His car is gorgeous!
If you end up having to modify that oil cooler, is it still going to be financially feasible vs selling it and getting a smaller one? lol
-
chickenwafer
- Posts: 2515
- Joined: Wed Mar 11, 2009 9:14
- Location: Greeley
-
chickenwafer
- Posts: 2515
- Joined: Wed Mar 11, 2009 9:14
- Location: Greeley
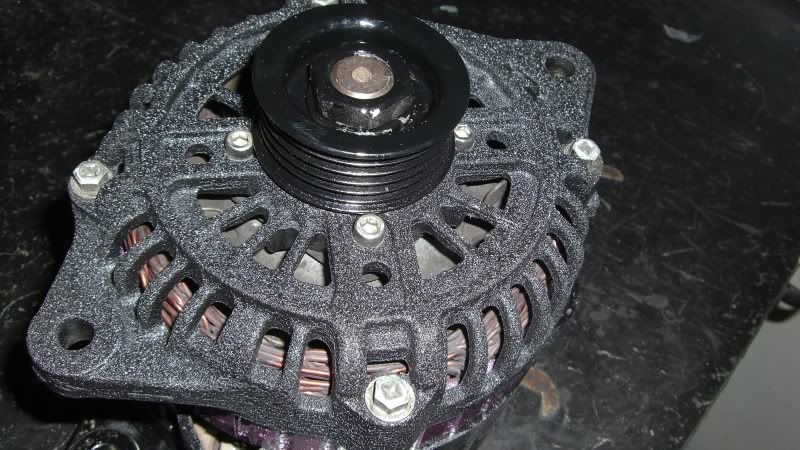
So I started assembling the alternator this morning. All was going smoothly and I thought I was doing a good job until the final torquing of the case bolts and then I realized the rotor wasn't spinning...kind of important.
I was able to get it to spin but only through a quarter of it's range, the bottom fins of the rotor are contacting the casing. I tried torquing the case bolts and front bearing support plate bolts on the front cover in a variety of different patterns and still couldn't get it to spin correctly.
So apart the alternator came again, and I can clearly see where the rotor cooling fins are contacting the bottom of the case. I'm really not sure why, Eric and I disassembled the alternator in 100% perfect work order. This feels a lot like that stupid water pump situation all over again haha.
Basically the rotor is sitting too far down in the case, but I no spacers or anything came out of the alternator when we disassembled it. I double checked the FSM alternator exploded diagram and I have every single piece and it's assembled correctly. The only thing I did was paint the exterior of the alternator case, nothing inside.
I was able to get the rotor to spin freely by stacking 2 thin washers under the bearing, inside the case. This spaced up the rotor enough to clear the case and not contact it, but I obviously can't assemble it this way (or can it?). I don't think the rotor would sit down flush enough then to get the two halves together. It's almost like the bearing needs to pulled out more.
-
chickenwafer
- Posts: 2515
- Joined: Wed Mar 11, 2009 9:14
- Location: Greeley
Got the alt fixed thanks to Matt. He quickly spotted one of the rotor's cooling fins on the bottom was bent. Hammered it back down and presto! Fixed.
I hit the case with some touch up paint, so just waiting for that to dry and the paint on the pulley and then it will be going back together.
Getting anxious to stack the motor. I have all the parts but I need to wait until I have consecutive days off.
I hit the case with some touch up paint, so just waiting for that to dry and the paint on the pulley and then it will be going back together.
Getting anxious to stack the motor. I have all the parts but I need to wait until I have consecutive days off.
-
chickenwafer
- Posts: 2515
- Joined: Wed Mar 11, 2009 9:14
- Location: Greeley


-
speedjunkie
- Senior Member
- Posts: 5365
- Joined: Wed Jan 02, 2008 9:14
- Location: Colorado Springs
- Contact:
Who is online
Users browsing this forum: No registered users and 80 guests