Build thread

Re: Build thread
Two fake ducts on the front bumper. Could use for brake ducts or oil cooler. Kind of limited on space for both.
-
speedjunkie

- Senior Member
- Posts: 5365
- Joined: Wed Jan 02, 2008 9:14
- Location: Colorado Springs
- Contact:
Re: Build thread
Oh ok. So can you build some functional ducts in there right? At least you have the space to put them there, that's a plus haha.

Re: Build thread
I don't think these will be a good thing. If your splitter is doing a good job you will have a low pressure area under it, and wheel wells naturally develop high pressure due to the wheels drawing in air and the magnus effect of the tire dragging air in from the ground. Your airflow will likely go from the wheel well out through the NACA and under the car. I installed a few on airplane APU and Janitrol retrofits and there was quite a bit of math the engineers did to find the area of highest pressure to install the NACA inlets. And just look at the APU inlet on a Boeing 737, they had to install that huge VG (Bicycle seat we call it) at the duct to force air into it to help the APU start in flight.
TL:DR; the NACA style ducts only really function well when moving air from a high pressure area to a low pressure area.
TL:DR; the NACA style ducts only really function well when moving air from a high pressure area to a low pressure area.
-
speedjunkie
- Senior Member
- Posts: 5365
- Joined: Wed Jan 02, 2008 9:14
- Location: Colorado Springs
- Contact:
Re: Build thread
Well I guess we'll see lol. I know I won't be the first one that's done this, but I'll have to find someone who has and see what they think.
Re: Build thread
DW, re-reading your post, could it be different in the center of the wheel since the duct is attached right behind the rotor? not sure what the pressure zone looks like inside the wheel vs inside the entire wheel well.
-
speedjunkie
- Senior Member
- Posts: 5365
- Joined: Wed Jan 02, 2008 9:14
- Location: Colorado Springs
- Contact:
Re: Build thread
The duct is going to the center of the brake rotor and I believe the rotor will be pulling the air through like a vacuum, which is one reason why I haven't had a duct on it yet, because it's still pulling air in, just not the coolest air.
Re: Build thread
Junkie, you mentioned a chassis mounted wing. Came across this on FB. http://driftdialects.com/collections/ex ... fd3sfd-kit
Know nothing about them, but their kit is cheaper than most wings.
Know nothing about them, but their kit is cheaper than most wings.
-
speedjunkie
- Senior Member
- Posts: 5365
- Joined: Wed Jan 02, 2008 9:14
- Location: Colorado Springs
- Contact:
Re: Build thread
Shadowden wrote:Junkie, you mentioned a chassis mounted wing. Came across this on FB. http://driftdialects.com/collections/ex ... fd3sfd-kit
Know nothing about them, but their kit is cheaper than most wings.
I posted this on Dec 13th.
speedjunkie wrote:There is a place in Denver that sells the Dibond, I have to get the info from Zico. So shipping shouldn't even be an issue. I've thought for a year or two about doing a wing, but I want to mount it on the back of the car instead of the hatch. Something like this, but probably have the stands further apart.
http://driftdialects.com/products/chass ... 2087443459
....

I have thought about just buying their kit instead of making one though. Like I said, I'd prefer the stands were further apart, but I'm not sure I could make it for cheaper than I can get that kit.
The new bumper and side skirts came in yesterday and I'm really excited about test fitting and getting them on. I'm thinking about reinforcing several parts of the bumper and sideskirt just to make them more durable, hopefully. I'm also thinking about getting a 99 spec bumper support because I think it might support my bumper a little better, and I'm looking at getting some FEED combo lights. They're actually cheaper than I thought they were.
http://www.rhdjapan.com/feed-halogen-co ... -fd3s.html
Re: Build thread
Approximately 10 times as many yen for those lights as a front efini badge!
I would think that they could adjust the mounting point on the wing for you if you knew how you would bolt up the stands and gave them the dimensions. It is a pretty cheap kit. I know chassis mount is supposed to be better and Swan neck chassis mount must be aero nirvana, but I go back and forth on the aesthetics of chassis mount systems.
I would think that they could adjust the mounting point on the wing for you if you knew how you would bolt up the stands and gave them the dimensions. It is a pretty cheap kit. I know chassis mount is supposed to be better and Swan neck chassis mount must be aero nirvana, but I go back and forth on the aesthetics of chassis mount systems.
-
speedjunkie
- Senior Member
- Posts: 5365
- Joined: Wed Jan 02, 2008 9:14
- Location: Colorado Springs
- Contact:
Re: Build thread
I could probably just cut the mounts and move them, but I think what I'll do is make the whole kit from scratch and just mount them to the stock rear bumper support, that way I can still use the foam on the support and fully support the bumper cover. Yeah I'm not even crazy about having a wing, but at least it's more functional this way. And I plan to make it as inconspicuous as possible when the stands and wing aren't installed.
-
speedjunkie
- Senior Member
- Posts: 5365
- Joined: Wed Jan 02, 2008 9:14
- Location: Colorado Springs
- Contact:
Re: Build thread
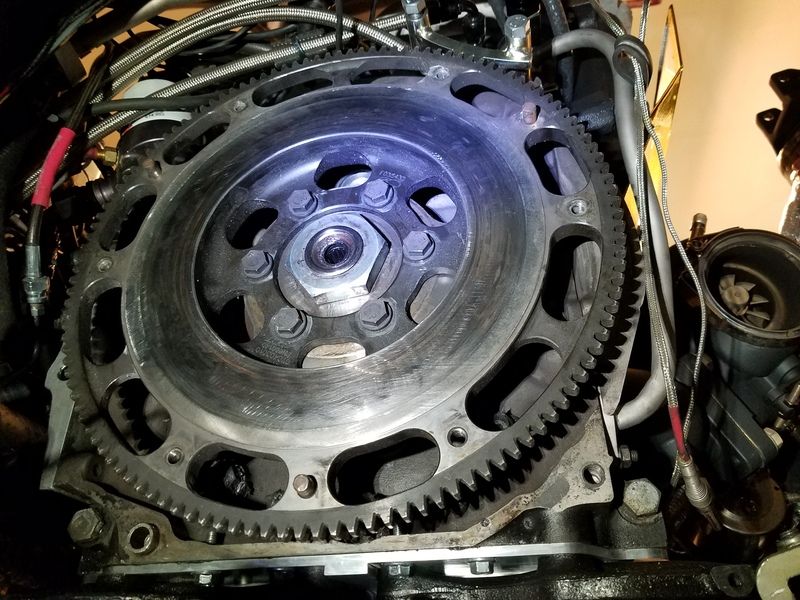
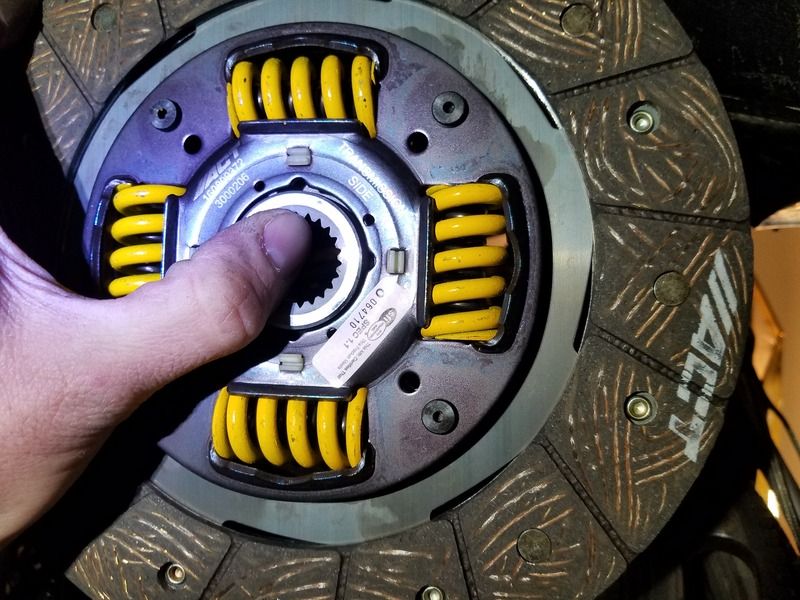
I started pulling the tranny yesterday but didn't get very far. Before I pulled too much out I decided to see first if I could separate the throwout bearing from the clutch, since it was such a pain to engage it. Well, that didn't turn out so great. Zico pressed on the clutch pedal while I pressed the Monoloc forward. No deal. So I cut excess length off an allen wrench so I could fit it through the inspection port and into the bolts and removed the 9 bolts holding the clutch together, and as I did it, pieces of the Monoloc that had broken off were falling out and hitting my glasses. So it looks like that's $60 down the drain, definitely going back to a stock assembly. Up to that point I had thought about just pushing it all back together and just dealing with the harsh engagement, but I'm glad I decided against that. Separating the clutch was as far as I got last night, and I was going to work on it today but I've been sick the last couple days and I'm sore today. Hopefully I will get over this and get back to wrenching soon. I can't stand letting this good weather go to waste.
As for another small project, I've been looking again about doing something with the ebrake handle. A couple of the libraries here in town have 3D printers but that might be too involved. I'm thinking about making a mold to make it out of resin like the shift knob, but I'll have to cut off the back half of it because it curves down on the back half and I can't slide the whole thing down in one piece, and the back half I'll probably have to cut into two pieces as well and glue them together or something. I'd like to customize the ebrake handle as well, maybe with my screenname or something, but I'm not sure on that yet.
As for another small project, I've been looking again about doing something with the ebrake handle. A couple of the libraries here in town have 3D printers but that might be too involved. I'm thinking about making a mold to make it out of resin like the shift knob, but I'll have to cut off the back half of it because it curves down on the back half and I can't slide the whole thing down in one piece, and the back half I'll probably have to cut into two pieces as well and glue them together or something. I'd like to customize the ebrake handle as well, maybe with my screenname or something, but I'm not sure on that yet.
-
speedjunkie
- Senior Member
- Posts: 5365
- Joined: Wed Jan 02, 2008 9:14
- Location: Colorado Springs
- Contact:
Re: Build thread
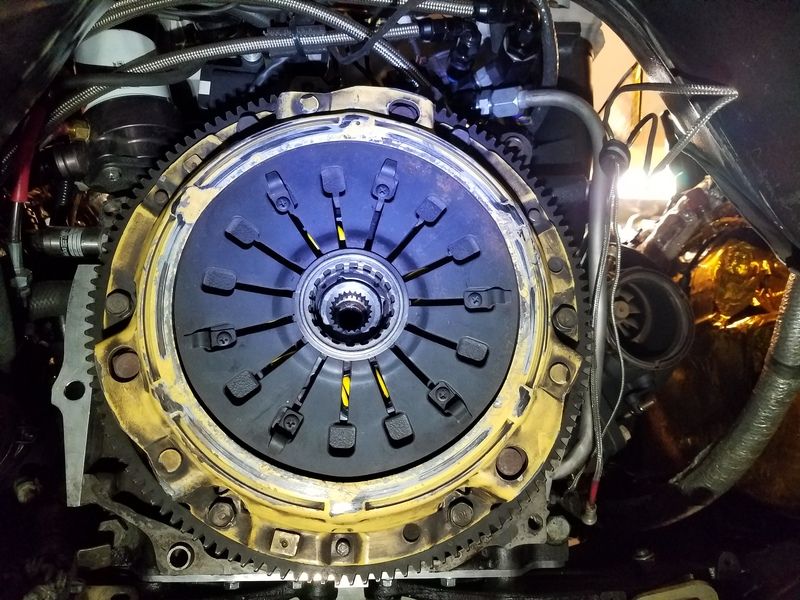
I finished swapping the clutch today. The only thing I didn't do is install the shifter, that's tomorrow.
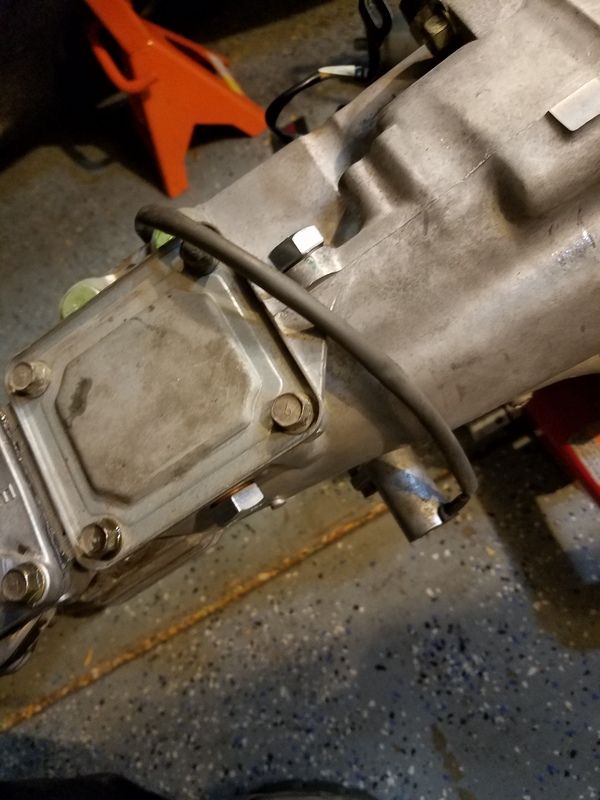
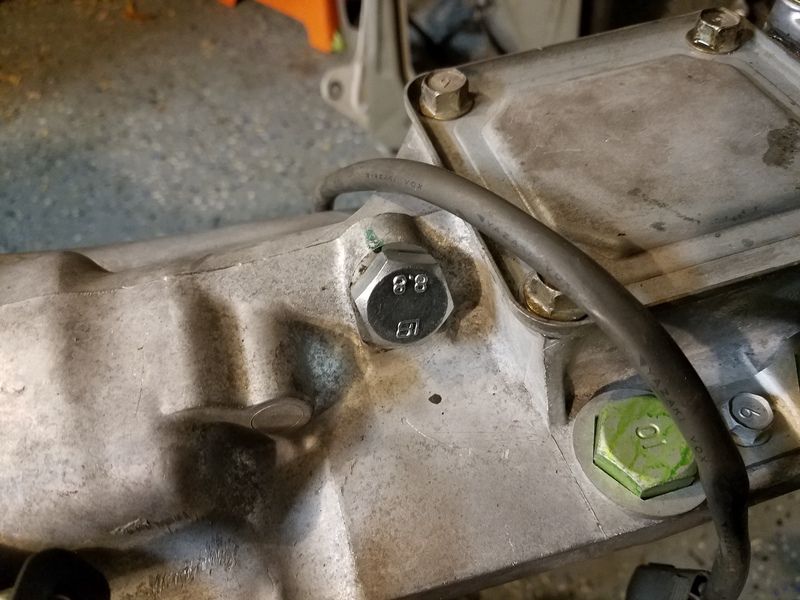
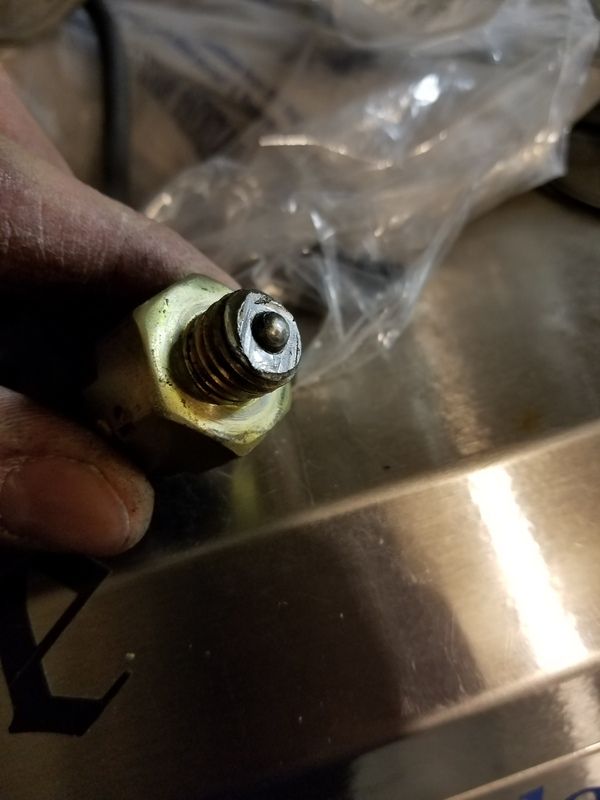
I discovered why the set screws I ordered from Fastenal won't work to plug the sensor holes on the tranny. It's because they're the wrong thread pitch lol. I was wondering why a Japanese transmission would have standard thread pitch. They're actually M14x2.00 instead of 9/16-1/2. So I bought a couple bolts from ACE and cut off the excess length.
I thought I had found the issue with why my tranny was shifting so rough, but then I remembered I pulled it out of the last tranny I had installed. So apparently this happened at some point.
I also discovered that I don't need the piece to push the exhaust down. I rotated the downpipe and now I have room so it doesn't hit the diff brace but also doesn't hit the crossmember that runs across the tranny tunnel. I'm hopeful that I won't hear the knocking sound anymore, but we'll see.


I discovered why the set screws I ordered from Fastenal won't work to plug the sensor holes on the tranny. It's because they're the wrong thread pitch lol. I was wondering why a Japanese transmission would have standard thread pitch. They're actually M14x2.00 instead of 9/16-1/2. So I bought a couple bolts from ACE and cut off the excess length.


I thought I had found the issue with why my tranny was shifting so rough, but then I remembered I pulled it out of the last tranny I had installed. So apparently this happened at some point.

I also discovered that I don't need the piece to push the exhaust down. I rotated the downpipe and now I have room so it doesn't hit the diff brace but also doesn't hit the crossmember that runs across the tranny tunnel. I'm hopeful that I won't hear the knocking sound anymore, but we'll see.
Re: Build thread
speedjunkie wrote:As for another small project, I've been looking again about doing something with the ebrake handle. A couple of the libraries here in town have 3D printers but that might be too involved. I'm thinking about making a mold to make it out of resin like the shift knob, but I'll have to cut off the back half of it because it curves down on the back half and I can't slide the whole thing down in one piece, and the back half I'll probably have to cut into two pieces as well and glue them together or something. I'd like to customize the ebrake handle as well, maybe with my screenname or something, but I'm not sure on that yet.
I read an article that said that the handle could be separated without damage using a heat gun and some man strength. I don't recall which forum (rx7club I think though). That same thread said that aftermarket ebrake handles were available from mazdaspeed. I didn't look too hard for a replacement handle for you. Seems like something custom machined would be the ticket.
-
speedjunkie
- Senior Member
- Posts: 5365
- Joined: Wed Jan 02, 2008 9:14
- Location: Colorado Springs
- Contact:
Re: Build thread
I've had an aftermarket handle for a while but I'm not crazy about it. It's made for a Miata but fits ours as well. To get the stock handle off I slit the length on the bottom and peeled it off like that, after removing the "leather" cover of course. I put it back on today just the way it is and it isn't bad even without a cover, but it's just temporary until I figure out how to make one. I have thought about just having it etched with a design and put it back in lol. I may still do that. 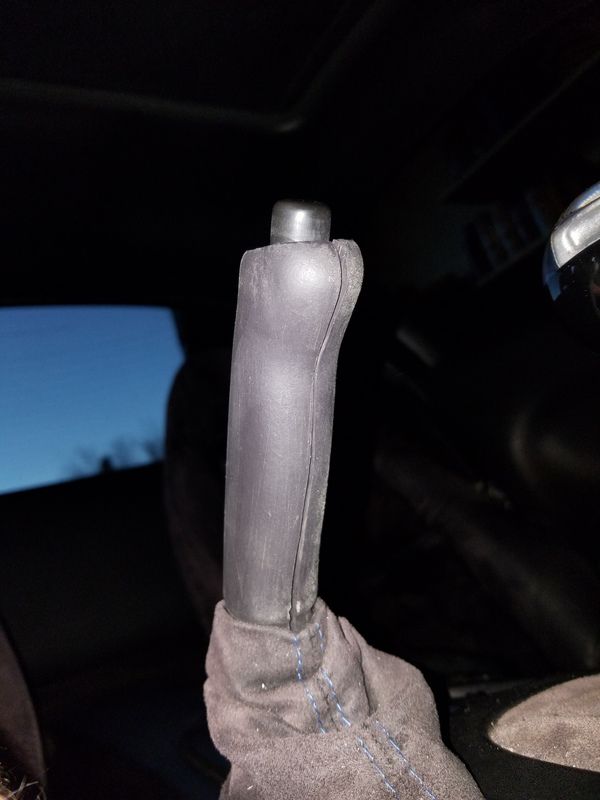
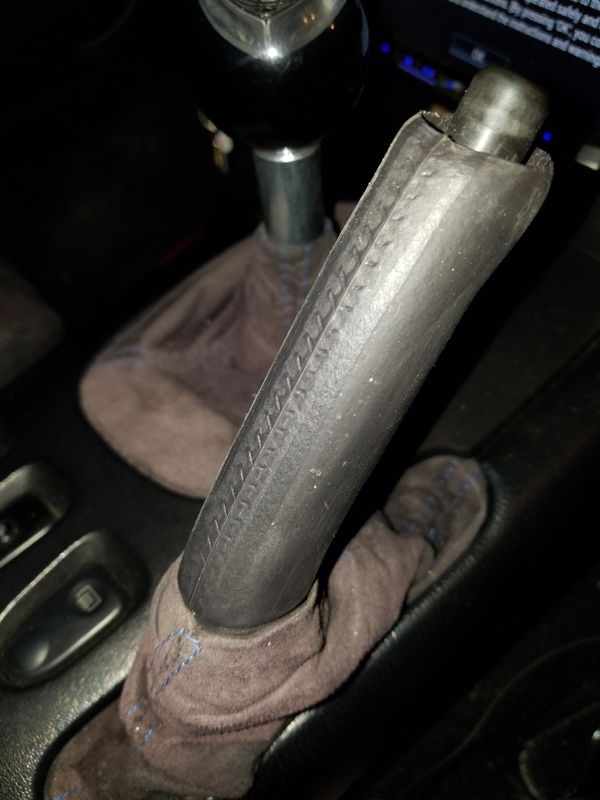
Whether I make a handle from a mold or just use this piece, I'll need to figure out a way to fill in the area around the button.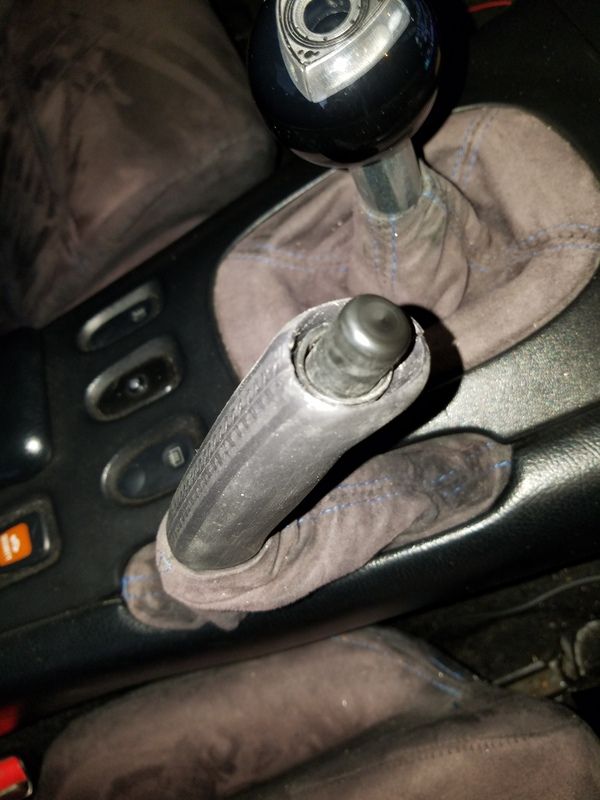
I've seen that Mazdaspeed makes some but if I remember right they're kinda rare and I'm not really crazy about them anyway. Other than Voodoo, who makes the Miata handle I have, I believe Mazdaspeed is the only company that makes any, and the Voodoo ones are easily attainable.
I drove the car a bit today, and oh my goodness I love this clutch compared to the twin plate. So much easier to drive. There's nothing I don't love about driving it now, except maybe that I still don't have AC for the summer lol.
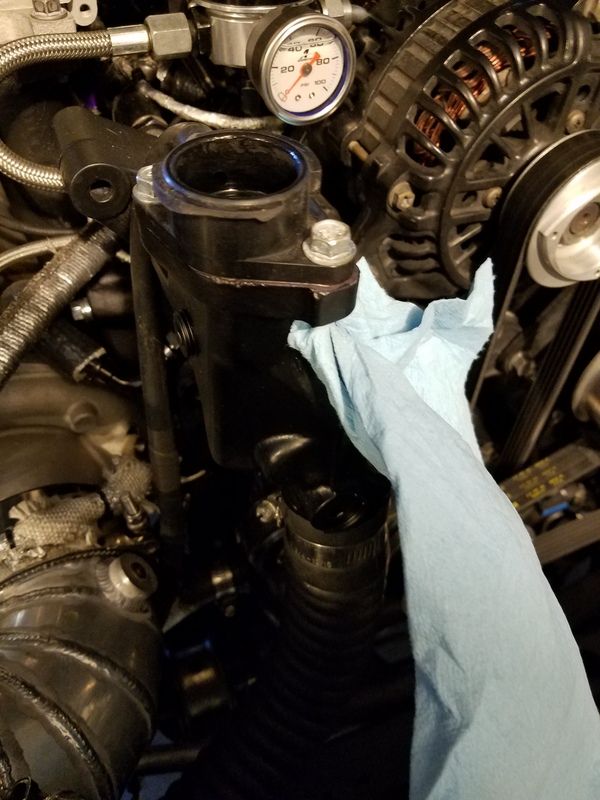
Before taking the car out I remembered the coolant seeping from the front of the thermostat housing. I removed the set screw and used a shop vac to suck out excess coolant, dried it, and resealed the threads using Right Stuff black RTV. It's supposed to set in one minute so I let it dry for about an hour before topping off the coolant and starting the car. STILL LEAKS. So I cranked down on it and it still seeped out a bit. I'm going to run it again and see how bad it is and let it cool down again and fix it if I need to. Ugh.
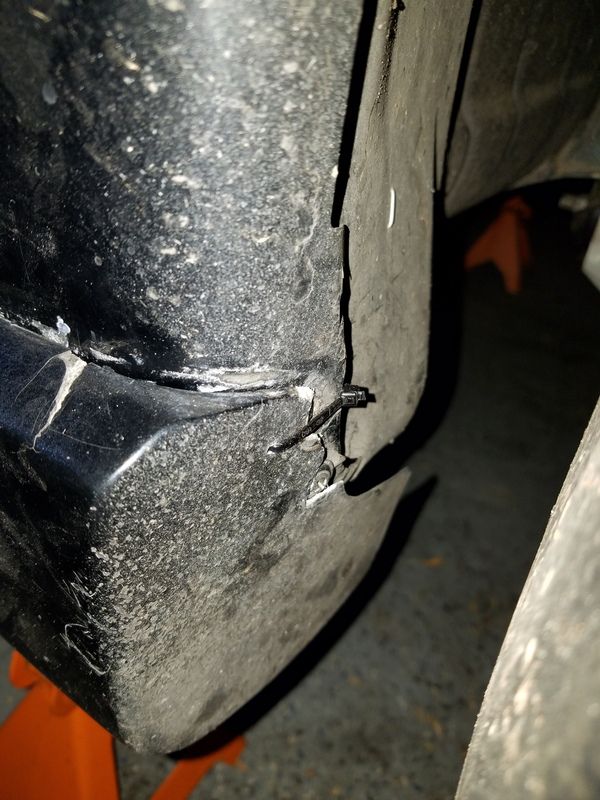
I also used a ziptie to keep the sideskirt from flopping around until I can replace it. Classy! Lol


Whether I make a handle from a mold or just use this piece, I'll need to figure out a way to fill in the area around the button.

I've seen that Mazdaspeed makes some but if I remember right they're kinda rare and I'm not really crazy about them anyway. Other than Voodoo, who makes the Miata handle I have, I believe Mazdaspeed is the only company that makes any, and the Voodoo ones are easily attainable.
I drove the car a bit today, and oh my goodness I love this clutch compared to the twin plate. So much easier to drive. There's nothing I don't love about driving it now, except maybe that I still don't have AC for the summer lol.
Before taking the car out I remembered the coolant seeping from the front of the thermostat housing. I removed the set screw and used a shop vac to suck out excess coolant, dried it, and resealed the threads using Right Stuff black RTV. It's supposed to set in one minute so I let it dry for about an hour before topping off the coolant and starting the car. STILL LEAKS. So I cranked down on it and it still seeped out a bit. I'm going to run it again and see how bad it is and let it cool down again and fix it if I need to. Ugh.

I also used a ziptie to keep the sideskirt from flopping around until I can replace it. Classy! Lol

-
speedjunkie
- Senior Member
- Posts: 5365
- Joined: Wed Jan 02, 2008 9:14
- Location: Colorado Springs
- Contact:
Re: Build thread
After the car cooled down I did some more testing. Still doing it actually, but hoping to be finished soon. I put my coolant system pressure tester on and had some issues with the pump, but if I pump it fast it works. Whatever. Anyway, at around 19psi I had a leak at the upper heater core hose. I had swapped the clamp on it from a worm gear to a stock clamp and at some point either this time or before I had damaged the copper nipple coming out of the heater core. It has a few dents in it toward the end of the nipple, so I slid the hose back some and put the clamp all the way at the end and it seems to have fixed it. I also had a radiator hose that was loose and leaking so I fixed that. I'm still trying to get the set screw to stop seeping, it's driving me crazy. I've really cranked down on it and I'm testing it again at about 1.1 bar, which is what my radiator cap is. We'll see what happens. I let it sit for about an hour starting at around 17psi and it had dropped to 12psi, and I noticed some coolant came out of the set screw again, but not a whole lot. I think when it's hot the coolant kind of seals the gap because earlier after I drove the car I didn't see any coolant. Maybe it burned off, I'm not sure.
However, after doing this test and seeing the pressure drop steadily, I'm wondering if it's even valid since the coolant seals aren't warmed up to 170F and expanded in order to seal off the combustion chambers. I'm wondering if I now have coolant in the engine.
However, after doing this test and seeing the pressure drop steadily, I'm wondering if it's even valid since the coolant seals aren't warmed up to 170F and expanded in order to seal off the combustion chambers. I'm wondering if I now have coolant in the engine.
Who is online
Users browsing this forum: Baidu [Spider], Google [Bot] and 161 guests