
You sure you wanna track it after making the brakes that purdy?
I need to make mine purdy too.
Build thread
-
speedjunkie

- Senior Member
- Posts: 5365
- Joined: Wed Jan 02, 2008 9:14
- Location: Colorado Springs
- Contact:
Re: Build thread
chickenwafer wrote:Brakes are looking mint man.
Cleaning out the intercooler...you could blow compressed air through it?
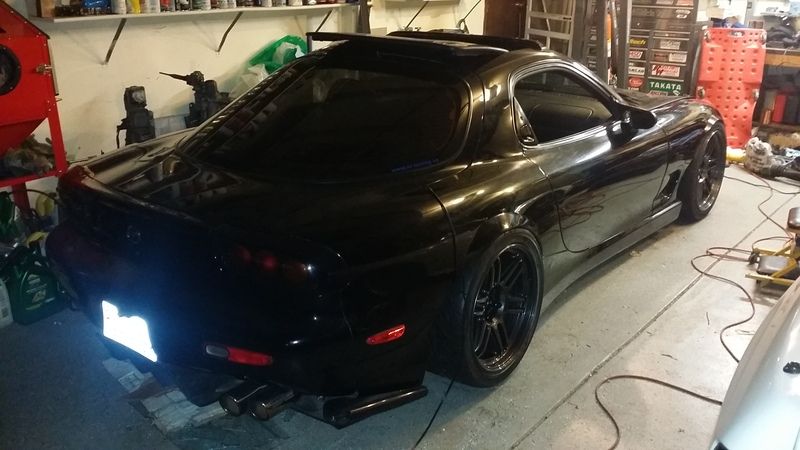
Thanks! I forgot to take a pic with the wheels on, it looks really good lol.
I don't have an air compressor at the moment so I'll have to take it somewhere. No big deal. I'll probably try that and possibly still take it somewhere that does the sonic cleaning, if there is one of those places around here. I'm just really nervous about shavings getting into the engine. First I need to spray brake cleaner in there to break up the oil mess which is causing the shavings to stick.
Saul_Good wrote:You sure you wanna track it after making the brakes that purdy?
I need to make mine purdy too.
Well I figure they'll get messed up during street driving anyway, so why not? Lol
I haven't touched the car in a couple days because I've been sick. Wednesday was actually the first day but I didn't recognize the symptoms until that night. I worked on the car all day and was really sore all over that night, but I thought it was just from working on the car.
I finished the brakes, bolted up the sway bar (smashing my thumb with the hammer in the process lol), and put the wheels on and dropped each side to torque the axle nuts. I raised the car back up and started taking the wheels off so I could lock the axle nuts in place but I was so sore at that point I decided to quit. I got the speed bleeders yesterday but I'm waiting until I'm over this to do anything more on the car. And I'm not sure how I did it but the ebrake is all out of adjustment, so I need to do that too. It doesn't even grab right now.
Mitch said he's coming over tomorrow to finish the turbo to IC pipe, and I marked the intake pipe the other night for him to put extra material on there so I can drill and tap them for bungs. I also gave him the stuff for making the OMP tank (the filler came in the other day) so he's going to have everything but the top welded on so I can put the mesh screen in to serve as a baffle.
And here are a couple more pics.


Re: Build thread
I like the color man. turned out well.
now get the whole thing together and driving so we can start cruising.
now get the whole thing together and driving so we can start cruising.

Re: Build thread
track event may 28 and 29 at Pueblo. I'm thinking about the 29th. would like to do both days, but we're going on a trip right afterward.
-
speedjunkie
- Senior Member
- Posts: 5365
- Joined: Wed Jan 02, 2008 9:14
- Location: Colorado Springs
- Contact:
Re: Build thread
lOOkatme wrote:I like the color man. turned out well.
now get the whole thing together and driving so we can start cruising.
The color of the calipers? Thanks! I got a little closer today, update below.
Shadowden wrote:track event may 28 and 29 at Pueblo. I'm thinking about the 29th. would like to do both days, but we're going on a trip right afterward.
I might be in Florida on the 28th with family. Not sure yet. Or did you post this in the wrong thread? lol
Mitch came over this morning and he finished cutting what we needed for the IC pipe. I think I pissed him off because I was kinda picky, but I want it how I want it haha. After he left I removed all the wheels, installed the front bleeders (I also swapped to a speed bleeder on the slave cylinder, it's the same size as the rear bleeders), and bled the brakes and clutch with the Mityvac. Zico is going to help me tomorrow to make sure they're bled, I'm not sure I trust this new way just yet.
I also cut some of the mesh screen to use as a baffle in the OMP tank and drilled and tapped the hole for the hose. I installed the screen and used water just to see if it would slow that down, because I figure if it will slow down water it will work on oil too. I did notice that it was slower, but I'm still concerned. I'm thinking of tilting it a little to help out some more. What do you guys think? Should I add more mesh too?


And here is what it'll look like in place.

I discovered the other day that the steering alignment is WAY off, so I was showing Zico yesterday and forgot that my passenger side wheel catches the sideskirt and it broke again, so once again I have nothing holding the front of the skirt in place. Really pisses me off.

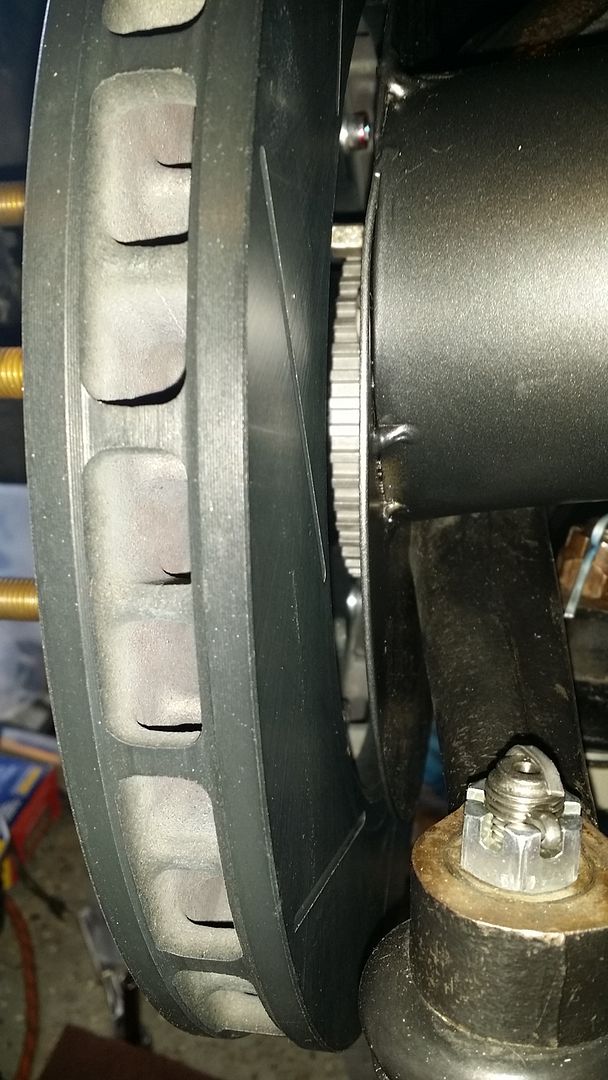
Here's what the brakes look like behind the wheels.


I still need to lock the axle nuts down, but I'm leery about doing the fronts because I'm not sure if I want to do something about the gap between the rotors and ducting plates before I finalize installation. Mitch said he'll have everything welded up and finished for me Monday night. I might actually be able to start the car this coming week.
-
speedjunkie
- Senior Member
- Posts: 5365
- Joined: Wed Jan 02, 2008 9:14
- Location: Colorado Springs
- Contact:
Re: Build thread
Not only did I not do much to the car today, I barely did anything PERIOD. lol
I locked down the rear axle nuts, I got out some spacers to use for the duct plate (but did not install them lol), and I tried washing the shavings out of the IC. I sprayed brake cleaner in and got out a bit, then ran a water hose through it, then sprayed brake cleaner in several more times. I think I got most of it, but I'm going to see if I can get cleaner in a large can so I can just pour it in and let it sit, then flush it later. And I'll STILL take it somewhere to get cleaned.
I asked on facebook to see what people thought about the mesh baffle and no one thought it was a good idea so I talked to Mitch and I'm going to make another cutout tomorrow for him to use to make two baffle plates with a few holes in them, then he'll just tack them in.
I also asked about the brake duct gap and another guy with these said he has a gap too, but he's going to close it up. The gap is almost 8mm and he said Porsche guys try to get within 1mm. I think I can manage that, as long as the spacers don't put the bolt heads too close to the ABS ring. Once I get all that sorted I'll do a final bleed of the brakes, adjust the tie rod ends, install the wheels, then maybe drop the car.

-
speedjunkie
- Senior Member
- Posts: 5365
- Joined: Wed Jan 02, 2008 9:14
- Location: Colorado Springs
- Contact:
Re: Build thread
I tried spacing out the duct plates today but it didn't work. Since the duct flange is already pressing against the hub while the plate is flush against the hub, it won't allow any spacing unless you drill the holes out larger or modify the duct flange itself and extend the dent in it that wraps around the part of the knuckle that it's hitting. The only other way is welding a ring onto the face of the plate to extend into the rotor. I'm going to do some testing with the extra pieces I have. So basically there is still the same amount of gap between the rotor and duct plate.
I adjusted the tie rods today. I wasn't sure if you could just loosen the lock nut and turn the tie rod, but I discovered that's exactly how to do it. WOOHOO!! Made things a lot easier and faster. I might have them toed out a little too far now though, but they're still closer than what they were. I should at least be able to drive it to get aligned now.
I swapped the black alternator back in and while I was doing that I swapped the fuel pressure gauge on the FPR. And I got the front axle nuts locked into place and the dust shields installed.
Zico was going to help me finish bleeding the brakes but he's been busy so maybe tomorrow. After that and washing the wheels, and of course installing the front bumper, the car will be back on the ground. I should have the stuff back from Mitch tomorrow night too. I still need to make the oil line for the OMP tank, I keep forgetting about that.
Re: Build thread
speedjunkie wrote:Shadowden wrote:track event may 28 and 29 at Pueblo. I'm thinking about the 29th. would like to do both days, but we're going on a trip right afterward.
I might be in Florida on the 28th with family. Not sure yet. Or did you post this in the wrong thread? lol
Nope. I got the right thread. Unfortunately, that weekend turns out to be bad for me too.
-
speedjunkie
- Senior Member
- Posts: 5365
- Joined: Wed Jan 02, 2008 9:14
- Location: Colorado Springs
- Contact:
Re: Build thread
I'll be coming back from Florida on the 28th and I highly doubt the car will be completely ready before I leave on Monday.
I put the bumper back on today, and I got the OMP tank back from Mitch tonight and drilled and tapped for a larger fitting. This one is 3/8-18 NPT instead of the 1/8-27 NPT and the hole is the same size as it passes through instead of the 1/8 that has a very small opening. That's the only reason I did it.
Mitch texted me and said all the parts are finished, so I'm going to pick them up tomorrow at 1130. I'm hoping to try to start the car tomorrow afternoon or night. Actually I'm hoping it just starts for me, but I know that won't happen lol.
-
speedjunkie
- Senior Member
- Posts: 5365
- Joined: Wed Jan 02, 2008 9:14
- Location: Colorado Springs
- Contact:
Re: Build thread
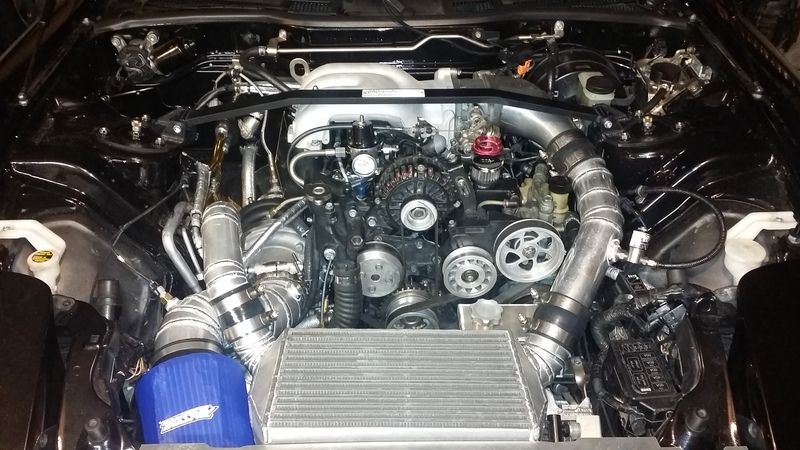
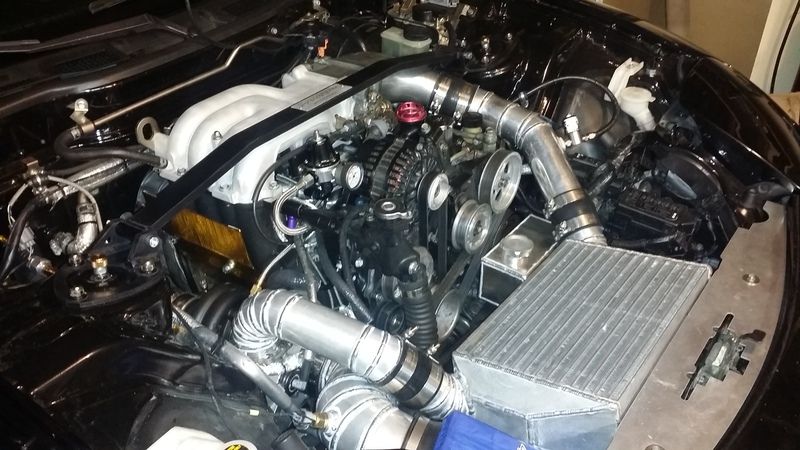
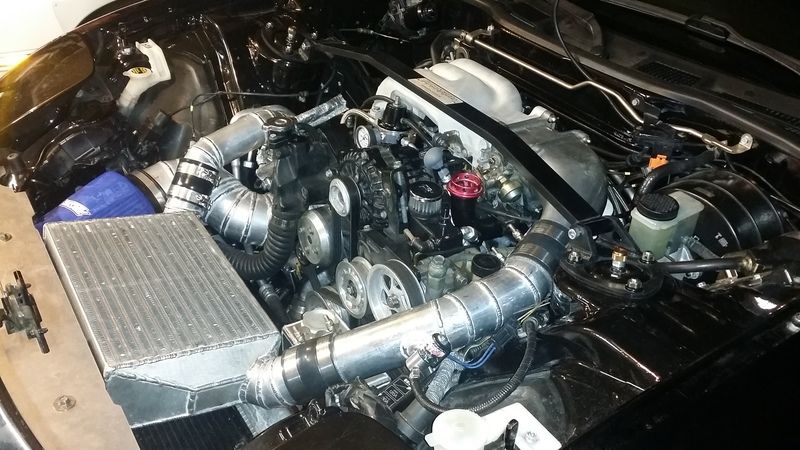
It's all back together and on the ground. I need to raise the car a little because it's practically tucking all the wheels already. I haven't tried again yet to start it either. That's tomorrow I guess. The clearance we had between the intake pipe and ic pipe is gone now and the filter is resting on the radiator and frame, and I had it not touching anything before. Oh well.


-
RX-7 Chris
- Posts: 7800
- Joined: Tue Oct 02, 2007 9:14
- Location: Colorado Springs
- Contact:
Re: Build thread
looks good.
Any updated on the starting problems?
Any updated on the starting problems?
1984 RX-7 GSL-SE [size=84]My restomod project[/SIZE]
1964 Ford Galaxie 500XL flat black w/ white interior, 2 dr fastback, 390 thunderbird, C6 auto, 2500 rpm high stall converter, shift kit, AC, Holley 750 cfm
[size=100]RIP 1983 RX-7[/SIZE]
My Car Blog
Re: Build thread
How much clearance was there before? Was that during the mock up and the clearance disappeared after final welding? If so, might be able to heat it and flex it back to get your clearance back. Don't know for sure though.
I seem to always look at this thread when I am at work and can't see pictures.
I seem to always look at this thread when I am at work and can't see pictures.
-
speedjunkie
- Senior Member
- Posts: 5365
- Joined: Wed Jan 02, 2008 9:14
- Location: Colorado Springs
- Contact:
Re: Build thread
RX-7 Chris wrote:looks good.
Any updated on the starting problems?
Thanks! No, I haven't looked into it anymore. It's an intermittent problem again, at least right now. I'll look into it again later.
Shadowden wrote:How much clearance was there before? Was that during the mock up and the clearance disappeared after final welding? If so, might be able to heat it and flex it back to get your clearance back. Don't know for sure though.
I seem to always look at this thread when I am at work and can't see pictures.
Not a whole lot of space, and maybe we didn't account for the coupler. Yeah we had some space during mock up but it's not too big of a deal. I think this filter still has more room than my last one.
-
$crillaTor

- Senior Member
- Posts: 153
- Joined: Sat Jun 15, 2013 9:14
- Location: Colorado Springs
Re: Build thread
The reason I am in the middle of replacing my radiator is because my intake was barely touching it and ended up gouging an impression into the fins of the radiator causing a leak over time. I mean, it was BARELY touching it but after probably only 300 miles, it rubbed it good enough to ruin my radiator. If it's just touching one of the tanks though and not the fins, you'll probably be fine. I'd hate to see the same crap that happened to mine happen to yours after you've put so much work into it. Re-doing ducting is a PITA... Hopefully I'll be done tonight minus the A/C hoses.
-
speedjunkie
- Senior Member
- Posts: 5365
- Joined: Wed Jan 02, 2008 9:14
- Location: Colorado Springs
- Contact:
Re: Build thread
Well the part it's touching isn't a tank nor fins, it's the additional part that the condenser rests on. Both places is resting on are hard surfaces, the only thing that would be damaged is the filter. That's with the intake pipe adjusted to where it's barely touching the IC pipe. I'll post a pic.
I was wondering if you were running or not.
I was wondering if you were running or not.
Who is online
Users browsing this forum: No registered users and 61 guests